MetaMask and Trezor
What is MetaMask?
MetaMask is a non-custodial cross-chain wallet that enables your Trezor device to manage and sign transactions on Ethereum and Ethereum virtual machine blockchains (EVM) including Binance Smart Chain, Polygon, FTM, and AVAX.
When your Trezor device is connected with MetaMask you can use it to manage your smart contracts and DApps, unlocking the power of MetaMask with the security of Trezor.
Since Trezor secures your private keys, you no longer need to rely on MetaMask to keep your keys safe. Your keys remain only in your Trezor device, protected by the hardware.
You can also connect your Trezor to decentralized applications directly through WalletConnect in Trezor Suite.
How to use MetaMask with Trezor
- Download the latest version of MetaMask for Chrome or Firefox. If you have not used MetaMask before, you will be required to set up a wallet and generate wallet backup which Metamask calls a "secret recovery phrase". This wallet backup is separate and is not part of your Trezor and is not necessary if you only intend to use MetaMask with your Trezor.
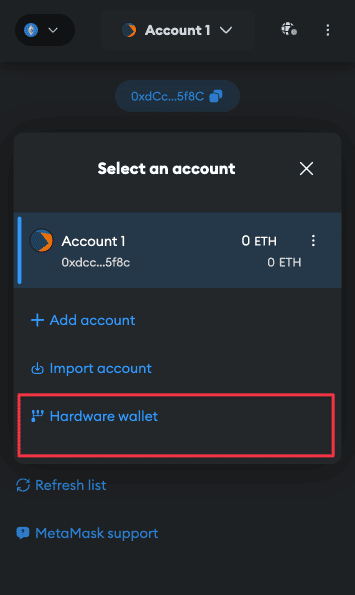
- Click on the account icon and select Hardware Wallet.
- Make sure your Trezor device is plugged in and click on Connect Trezor.
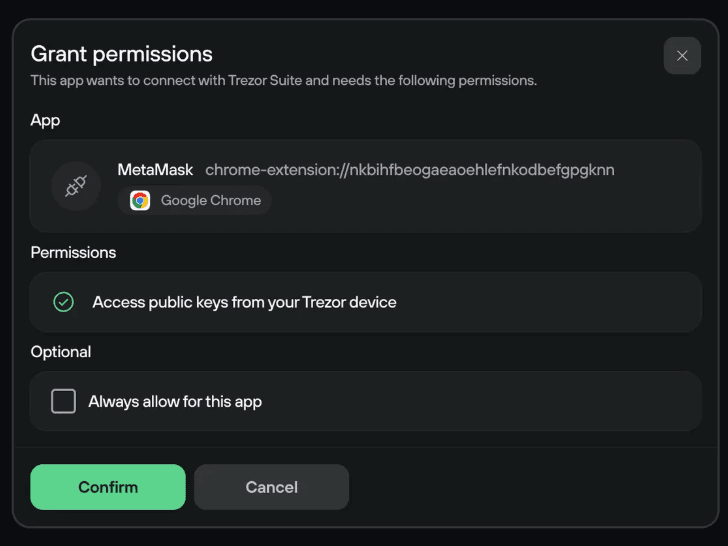
- A Trezor Connect prompt will pop up asking for permissions and a request to export the public key. Allow and export to continue.
- Select the account you want to use and click on Unlock.
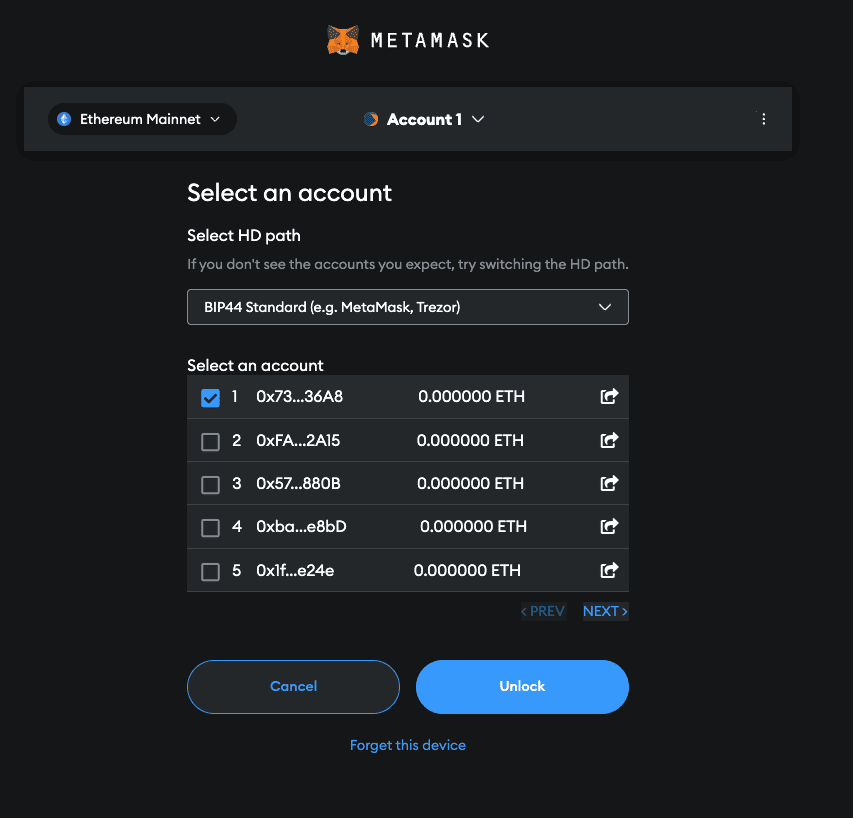
The accounts are presented in a specific order. Therefore, if you choose the third address on the list the 3rd address will not appear in Trezor Suite until you have used the second address.
- You have successfully imported an account (its public keys) to MetaMask. Repeat for other accounts if you have more than one.
Sending transactions
- Fill in the transaction details.
- Click on Next and then Confirm
- Check the transaction details on your Trezor device and confirm.
- Done.
Signing messages
You can also use MetaMask to sign messages. Message signing allows you to sign in into certain DApps, such as CryptoKitties - see the short video below.
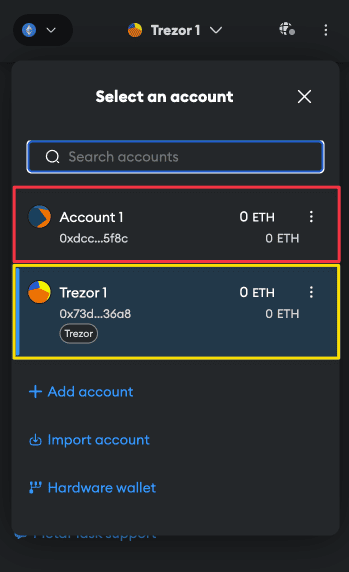
Once you initialize MetaMask there is a default account created (the red one in the screenshot below). If you wish to use it, then you need to keep your MetaMask wallet backup to recover and access this account whenever needed. This account is not part of your Trezor Wallet.
The Trezor account (the one outlined in yellow) is the same account generated in Trezor Suite. This is a Trezor generated account and can be recovered only by using a Trezor wallet backup.
Even if your Trezor device is not connected, in MetaMask you can still see;
- Your default MetaMask account
- Your previously used Trezor generated wallet(s) with different wallet backup(s)
- Your Trezor generated wallet(s) with passphrase(s)
All three wallets mentioned (1, 2, 3) would differ from your currently used Trezor Wallet. Only the first MetaMask account (1) can be used without your Trezor because it is independent of Trezor completely.
However, as for other accounts (2, 3) you may see, the related Trezor device must be connected (either with the appropriate wallet backup and/or with the appropriate passphrase). Otherwise, you will not be able to sign any transactions within these accounts due to missing the appropriate private key stored on Trezor.
If you are unable to access that account by using Trezor Suite, then the account you want to access via MetaMask is not part of your Trezor wallet.
The following video also shows how Trezor will always generate the same wallet, accounts, and addresses when the same wallet backup (and passphrase) is used:
Do you still feel lost or overwhelmed ? Book your session with Trezor Expert where you can discuss all things related to Trezor and MetaMask and more: