Swap crypto in Trezor Suite
Trezor Suite makes it easy to swap your digital assets directly within the app. This article explains the difference between centralized exchanges (CEX) and decentralized exchanges (DEX), and how to use both.
Swap services in Trezor Suite are subject to the Trezor Suite Terms of Use. Third-party exchange providers may have additional terms.
Accessing the Swap feature
You can access the Swap feature from two places in Trezor Suite:
From the Dashboard: Click the Swap button in the top right corner.
From any crypto account: Open any account (like Bitcoin #1 or Ethereum #1) and click the Swap button in the top right corner.

Browsing exchange options
Swapping directly in Trezor Suite is convenient and secure. You approve the transaction on your Trezor device, and the exchanged funds are sent directly to your Trezor wallet.
When you open the Swap feature, Trezor Suite shows you the best available offer, either from a centralized exchange (CEX) or decentralized exchange (DEX), depending on your selected assets and network.
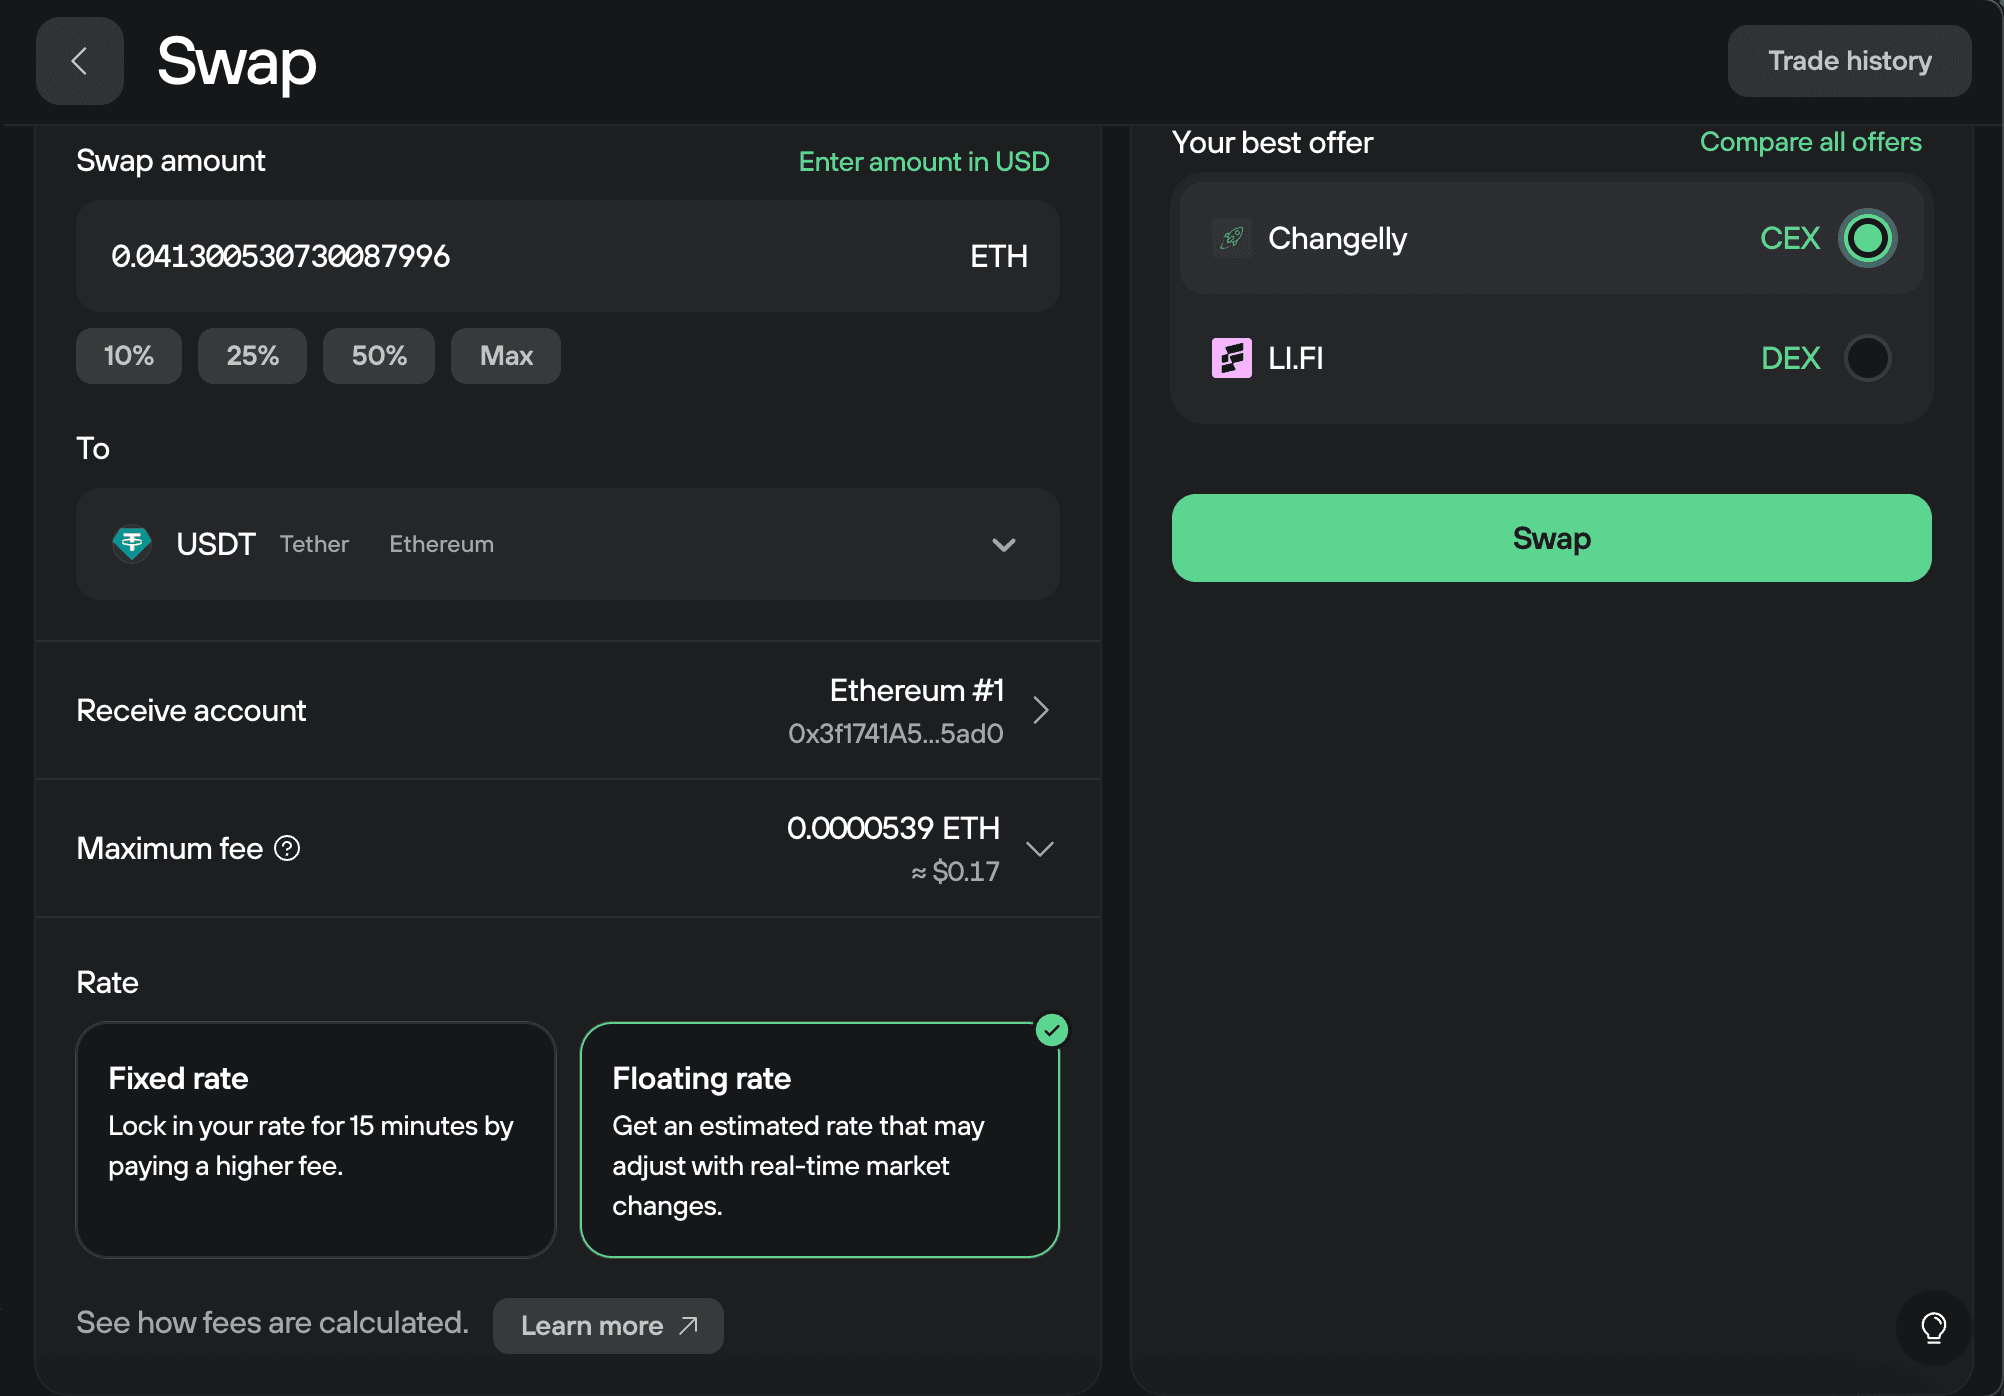
You can toggle between CEX and DEX options when both are available for your swap.
To browse all available providers and compare rates, click Compare all offers.
The complete list is organized into three categories:
- Fixed-rate CEX - Locks in your exchange rate for 15 minutes. Useful during price fluctuations but charges higher fees. You must complete the swap within 15 minutes or the rate expires.
- Floating-rate CEX - Uses real-time market rates. More flexible timing but the final rate may differ slightly from the initial quote.
- DEX (KYC never required) - Decentralized exchanges on EVM networks
Centralized exchanges (CEX)
Centralized exchanges are integrated into Trezor Suite and work with any supported cryptocurrency across different blockchains. Most providers require identity verification (KYC) to comply with regulations.
Decentralized exchanges (DEX)
Decentralized exchanges let you swap tokens directly on the blockchain on EVM-based networks like Ethereum, Base, and BNB Smart Chain. No account creation or KYC required. DEX swaps are limited to EVM assets only.
Solana tokens cannot be swapped using DEX because Solana is not EVM-based. You can still swap Solana tokens using centralized exchanges (CEX).
Using centralized exchanges (CEX)
Centralized exchange providers are integrated into Trezor Suite. These providers are carefully selected and vetted to ensure quality service.
Service providers may ask for personal identification to comply with AML/KYC regulations.
Selecting your swap details
Select the account of the cryptocurrency you want to convert in Trezor Suite.
Click the gray Swap button to open the Swap tab in the Trade section.
Select CEX to use a centralized exchange.
Choose which asset you want to swap from using the drop-down menu. You can select any coin that Trezor supports.
Enter the amount of the asset you wish to swap. You can specify either the amount of coins or the fiat value.
Select the asset you want to receive. You can choose any supported cryptocurrency.
Choose your receive account - the Trezor account where you want the swapped assets sent.
Set your network fee (normal is recommended).
Choose your rate type: Fixed or Floating.
Most default offers come from exchanges with no KYC requirements. Click Compare all offers to see all available options and review the KYC policies of participating providers.

When you're ready, click Swap.
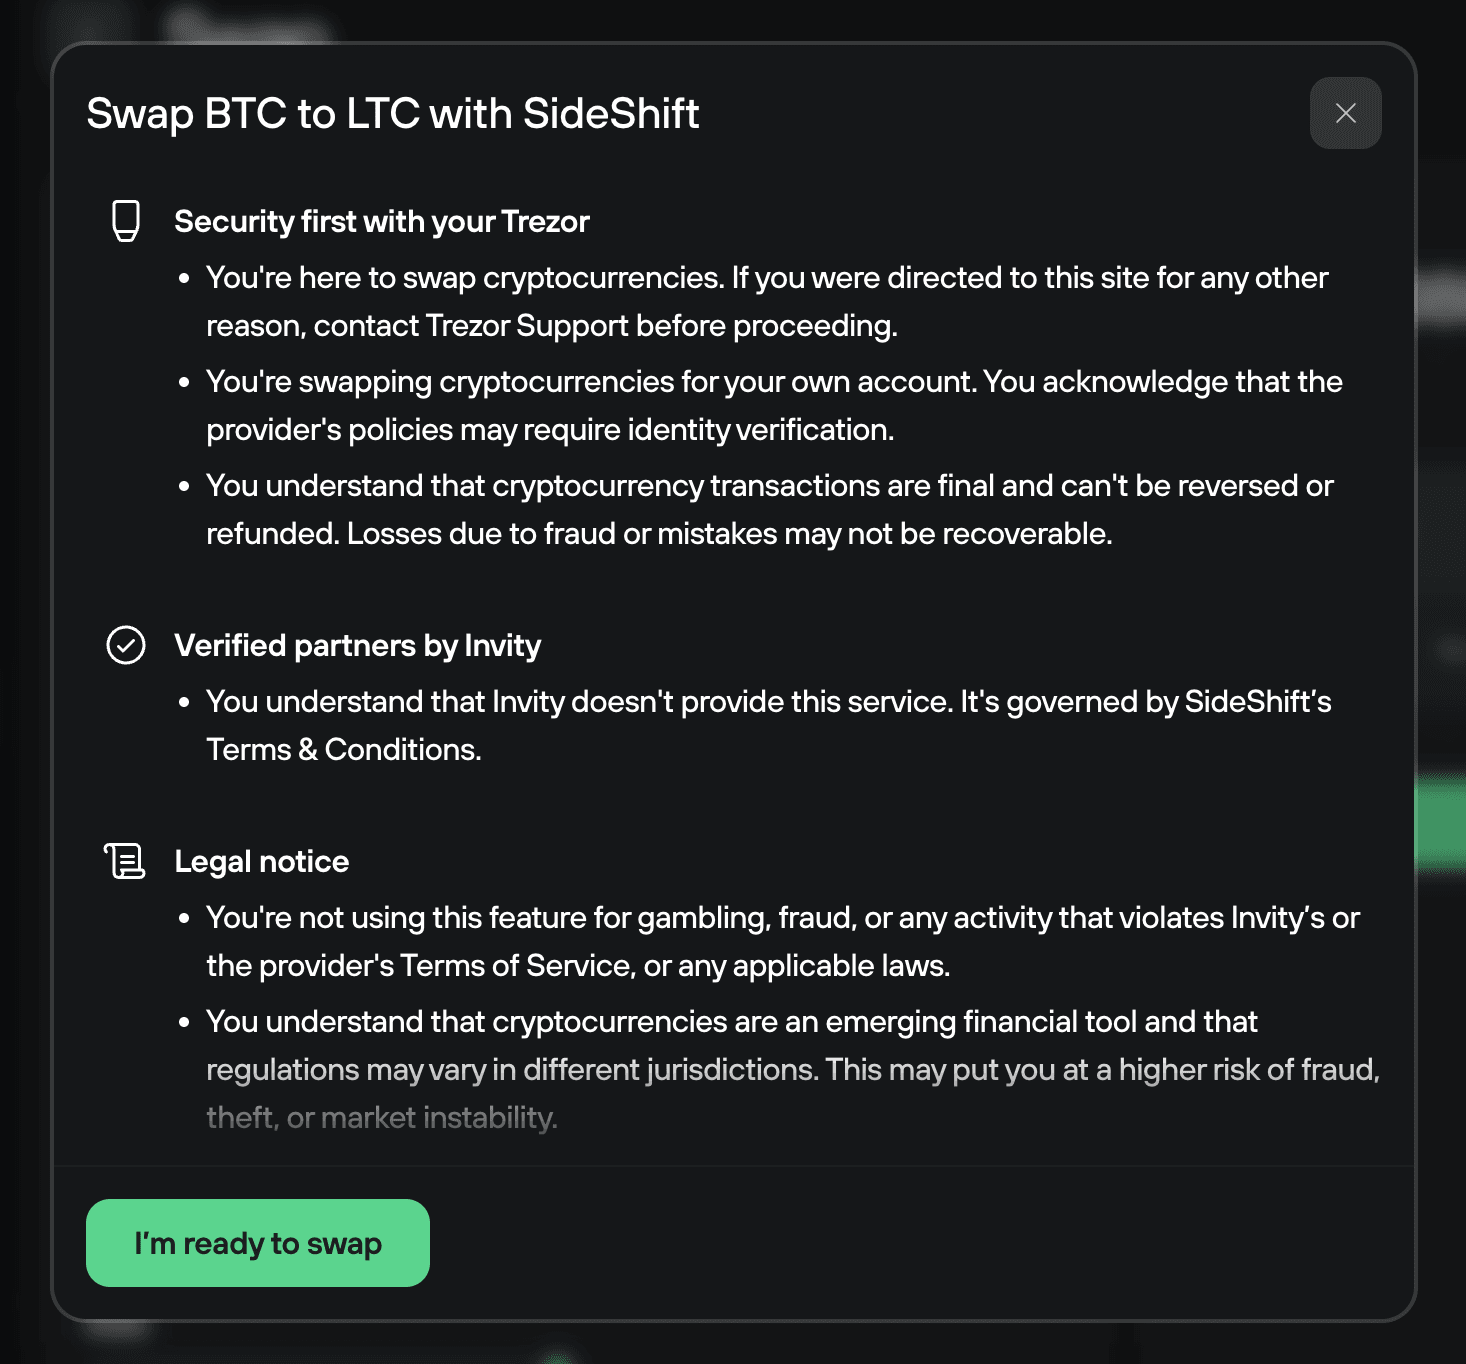
Review the security information and legal notices, then click I'm ready to swap.
Completing your swap
Review the swap summary, including the exchange rate, network fee, provider, and any KYC requirements.
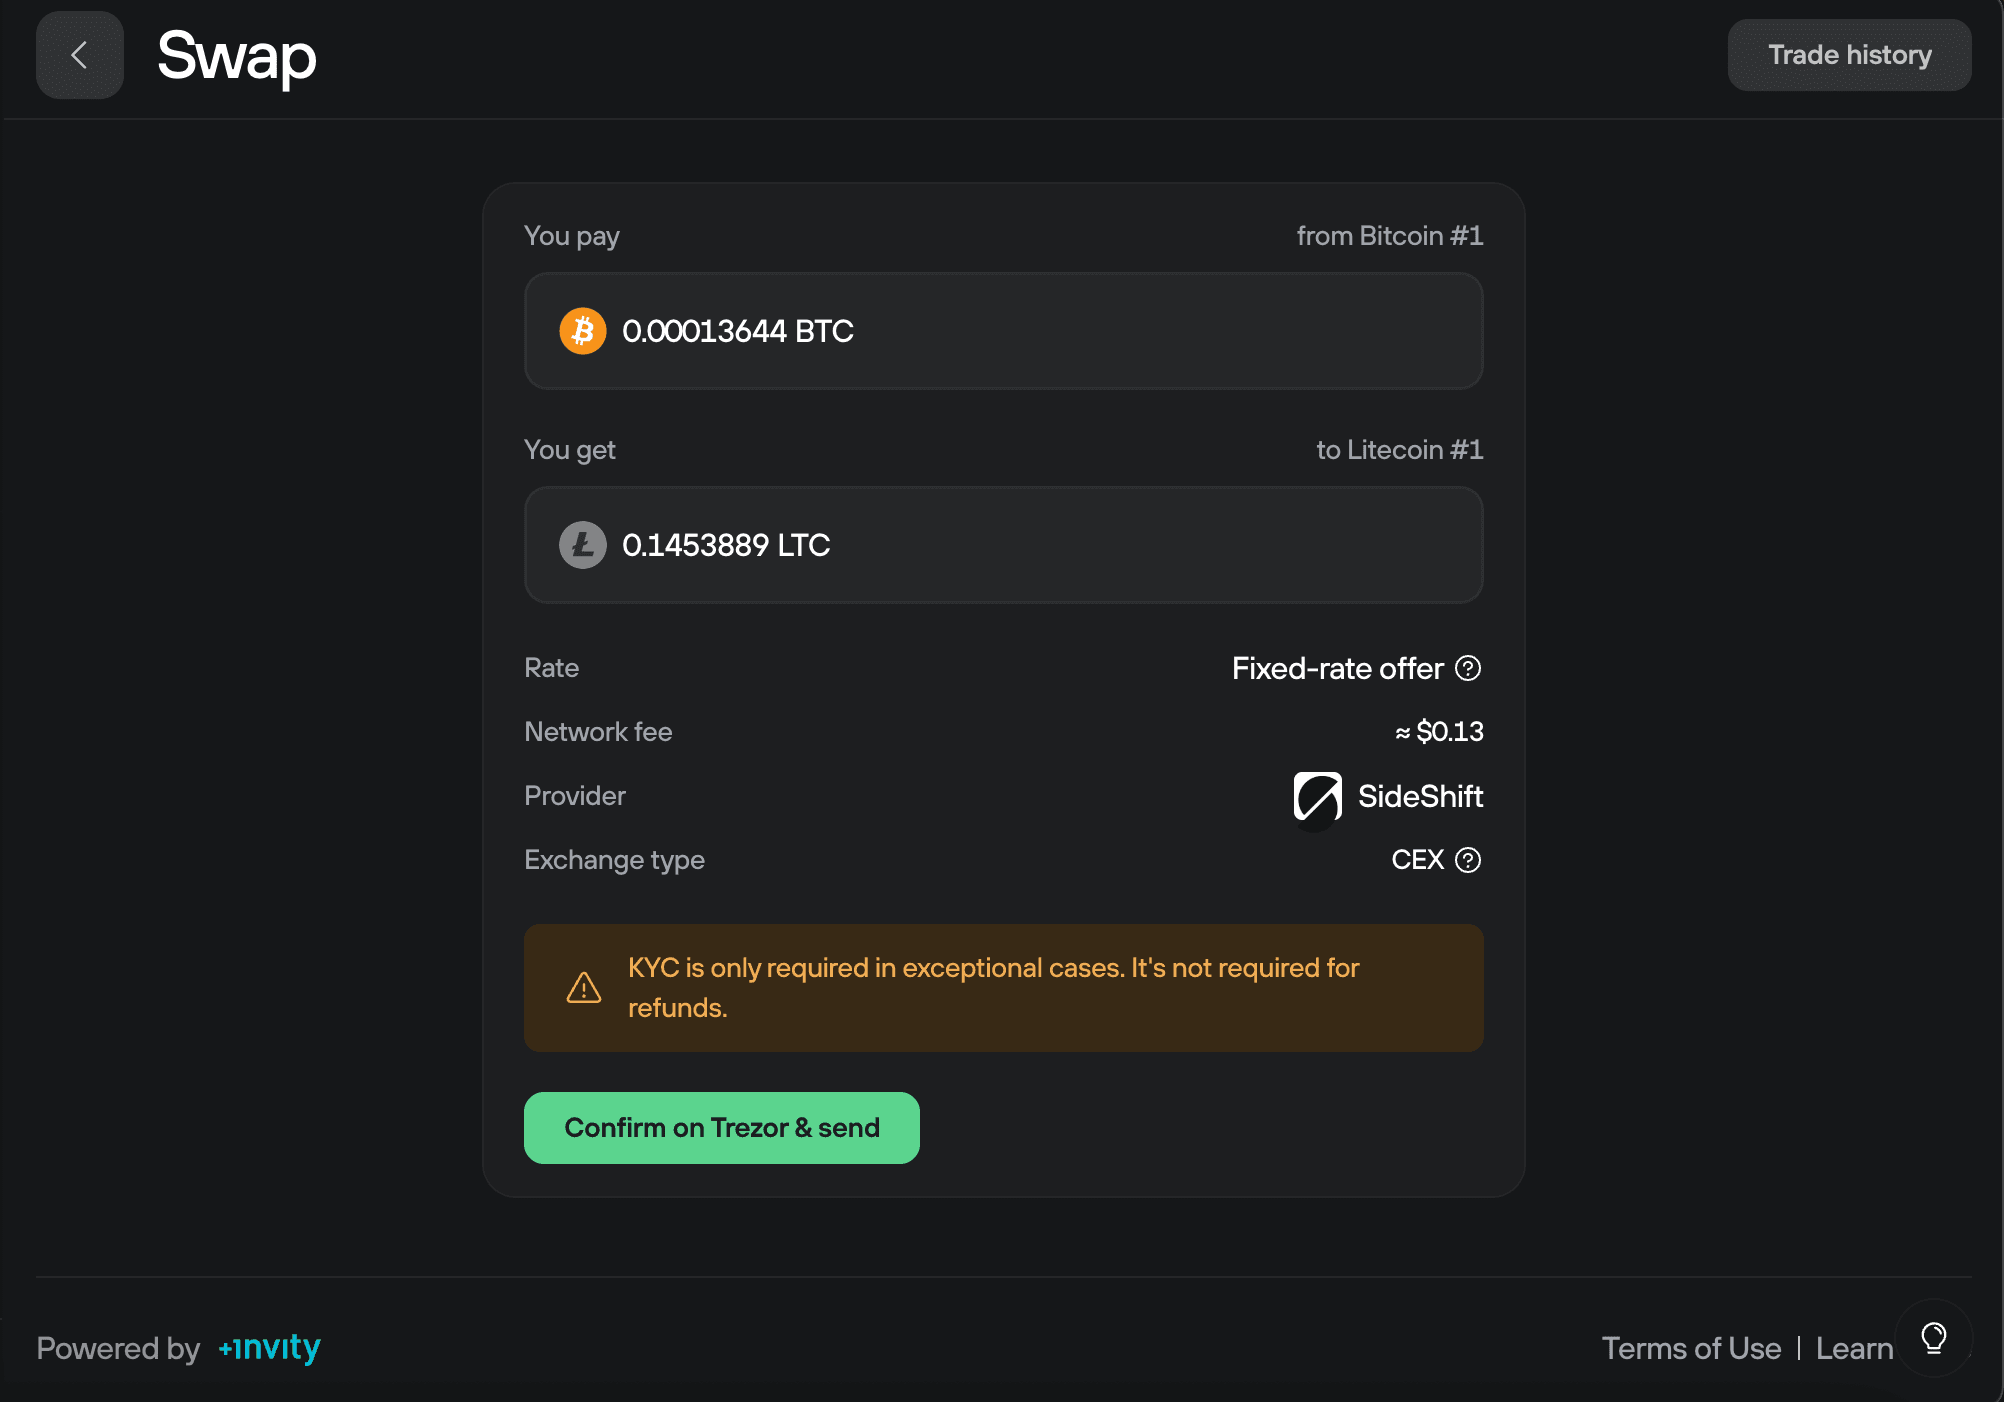
Select Confirm on Trezor & send.
Open your Trezor device and confirm the transaction on the Trusted Display. Make sure all details match what you see in Trezor Suite.
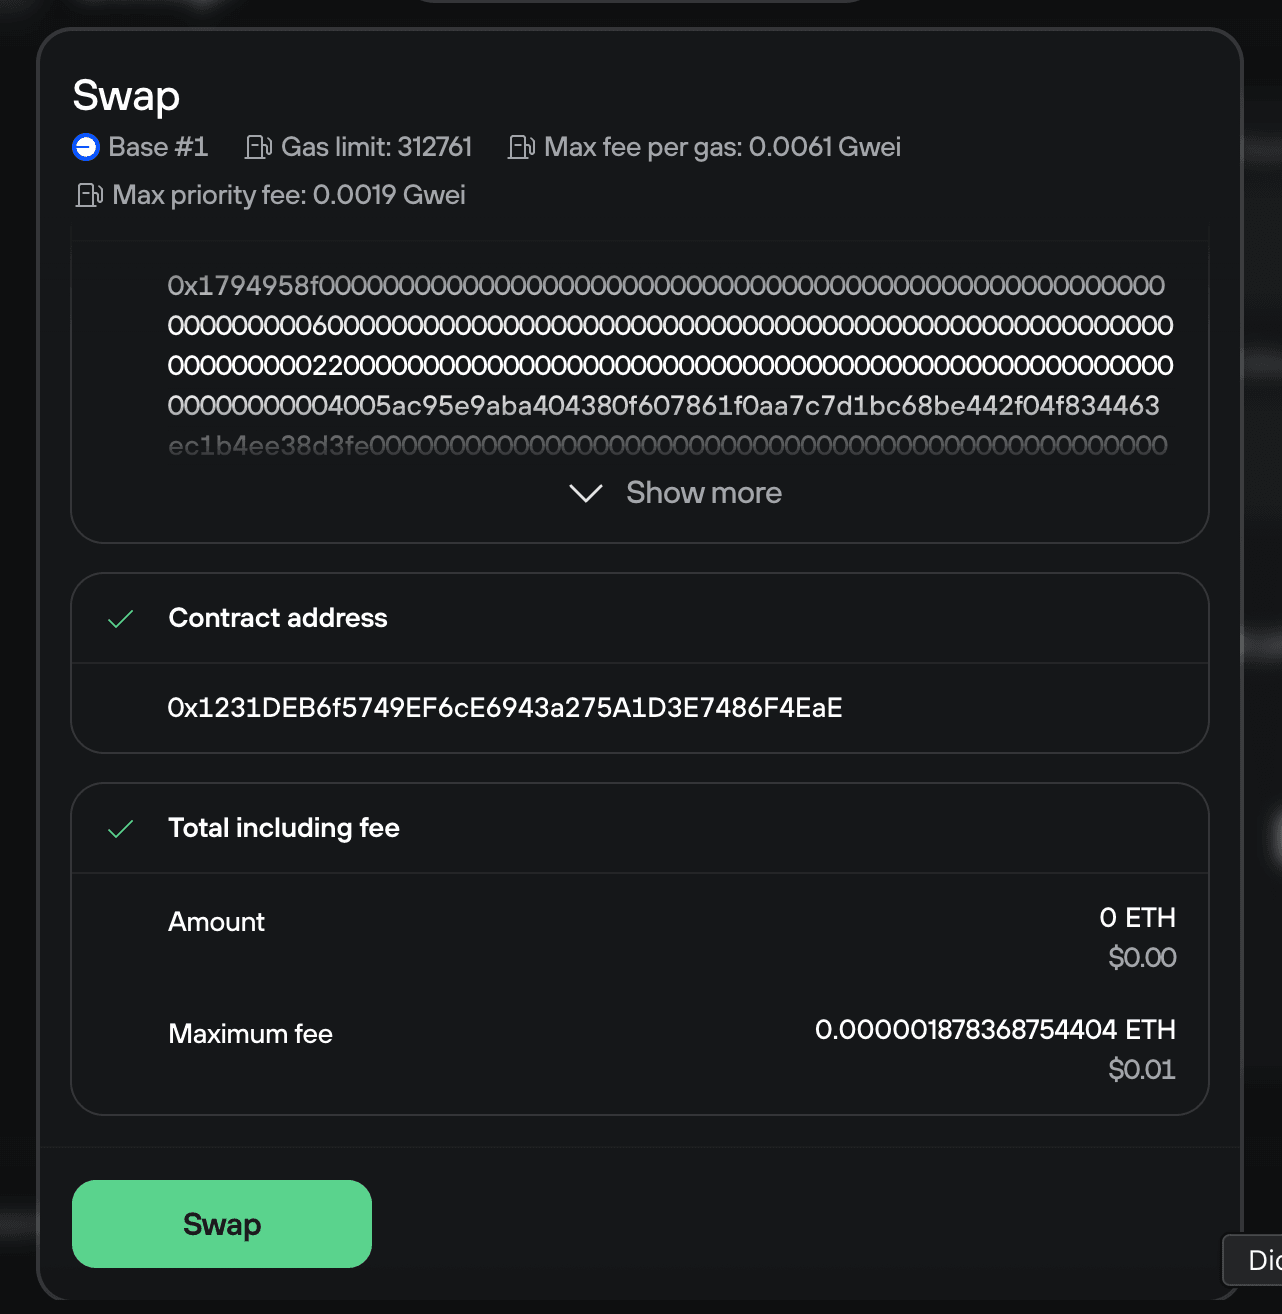
After confirming, you'll see a confirmation screen with transaction details.
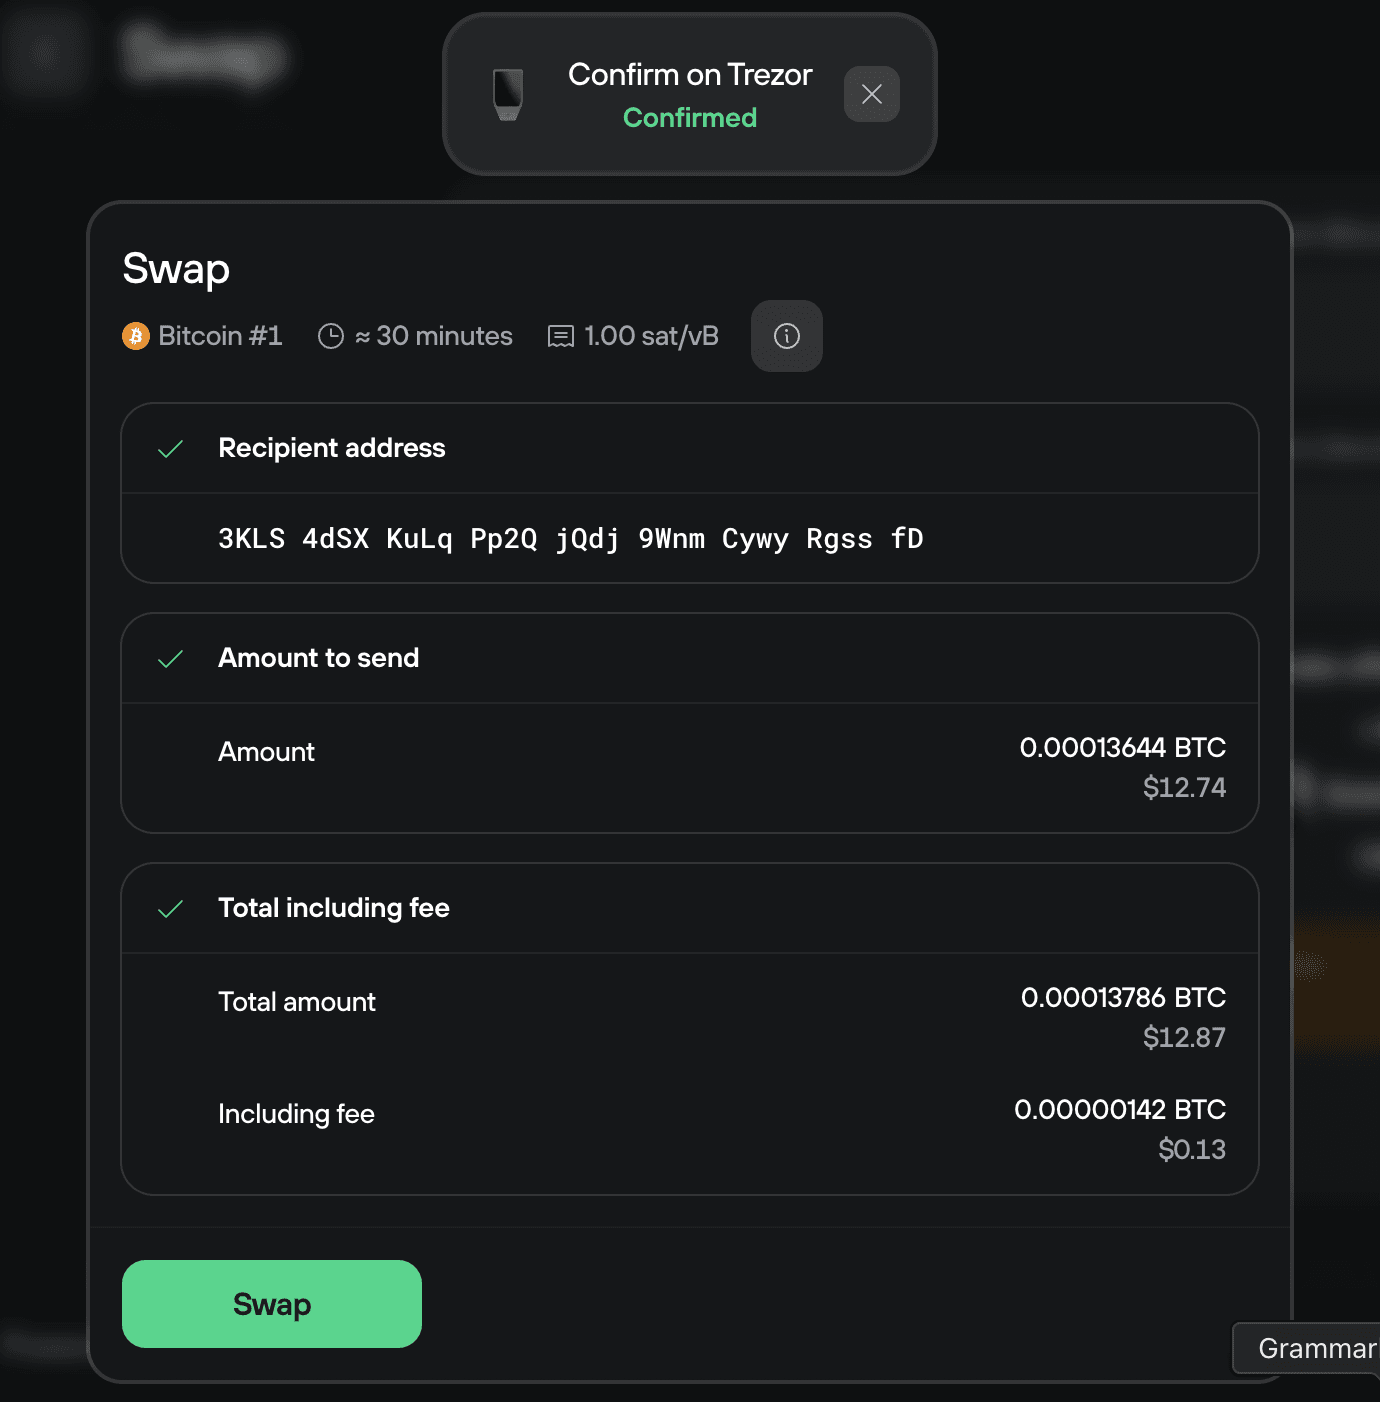
Click Swap to broadcast the transaction and complete your swap.
If a swap fails, you'll receive a refund of your original coins. In rare cases, the exchange may require identity verification to process the refund.
Using decentralized exchanges (DEX)
Decentralized exchanges let you swap assets directly on the blockchain without creating an account. All trades are executed on-chain between the two parties with no intermediaries.
Trezor Suite supports DEX-based swaps on selected EVM networks, allowing you to exchange tokens directly within the app.
Please note: Solana tokens cannot be swapped using DEX because Solana is not EVM-based. You can still swap Solana tokens using centralized exchanges (CEX) or third-party apps.
Understanding token approvals
When swapping tokens across different EVM networks, you need to complete two transactions. The first transaction approves the DEX provider to access your tokens. The second transaction executes the actual swap.
Smart contracts need your explicit permission to move tokens on your behalf. This is a security feature built into ERC-20 tokens to protect your funds.
Swapping tokens on the same network (like ETH to USDT on Ethereum) only requires one transaction—just the swap itself. Swapping tokens across different networks (like USDC on Ethereum to USDC on Base) requires an approval transaction first, then the swap.
Selecting your swap details
Select the account of the cryptocurrency you want to convert in Trezor Suite.
Click the gray Swap button to open the Swap tab in the Trade section.
Choose which asset you want to swap from using the drop-down menu.
Enter the amount of the asset you wish to swap. You can specify either the amount of coins or the fiat value.
Select the asset you want to receive on the destination network.
Choose your receive account - the Trezor account where you want the swapped assets sent.
Set your network fee (normal is recommended).
Choose your rate type: Fixed or Floating
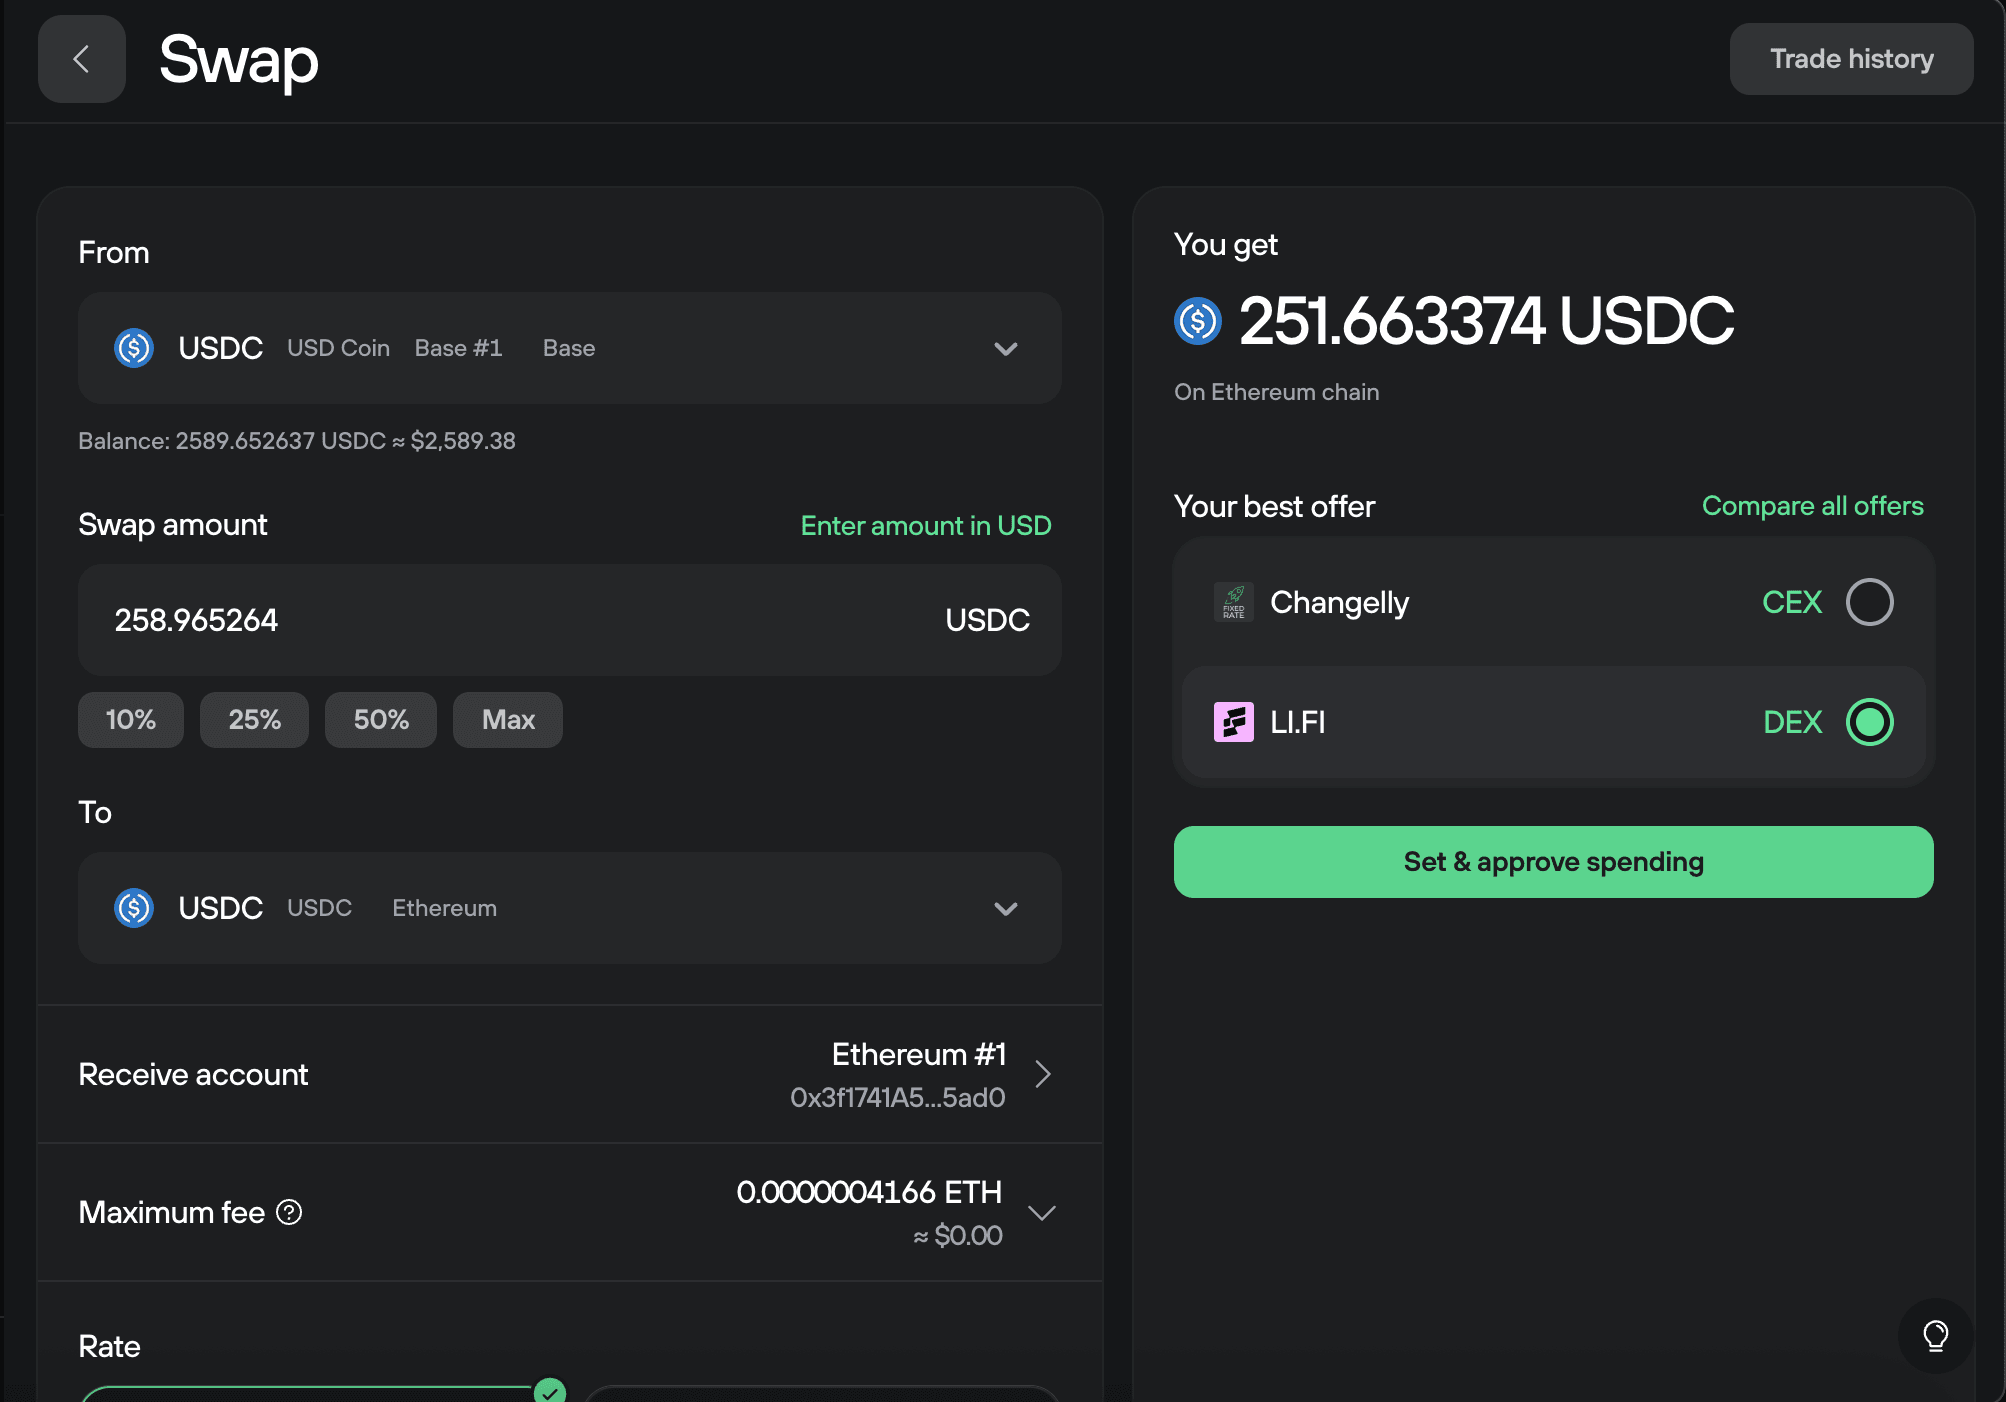
If you're swapping tokens across different networks, you'll need to approve token spending first before the swap. Click Set & approve spending.
If you're swapping on the same network, you'll see a Swap button instead. Skip to the "Completing the swap" section below.
Approving token spending
This section only applies when you're swapping tokens to a different EVM network.
Choose your approval limit:
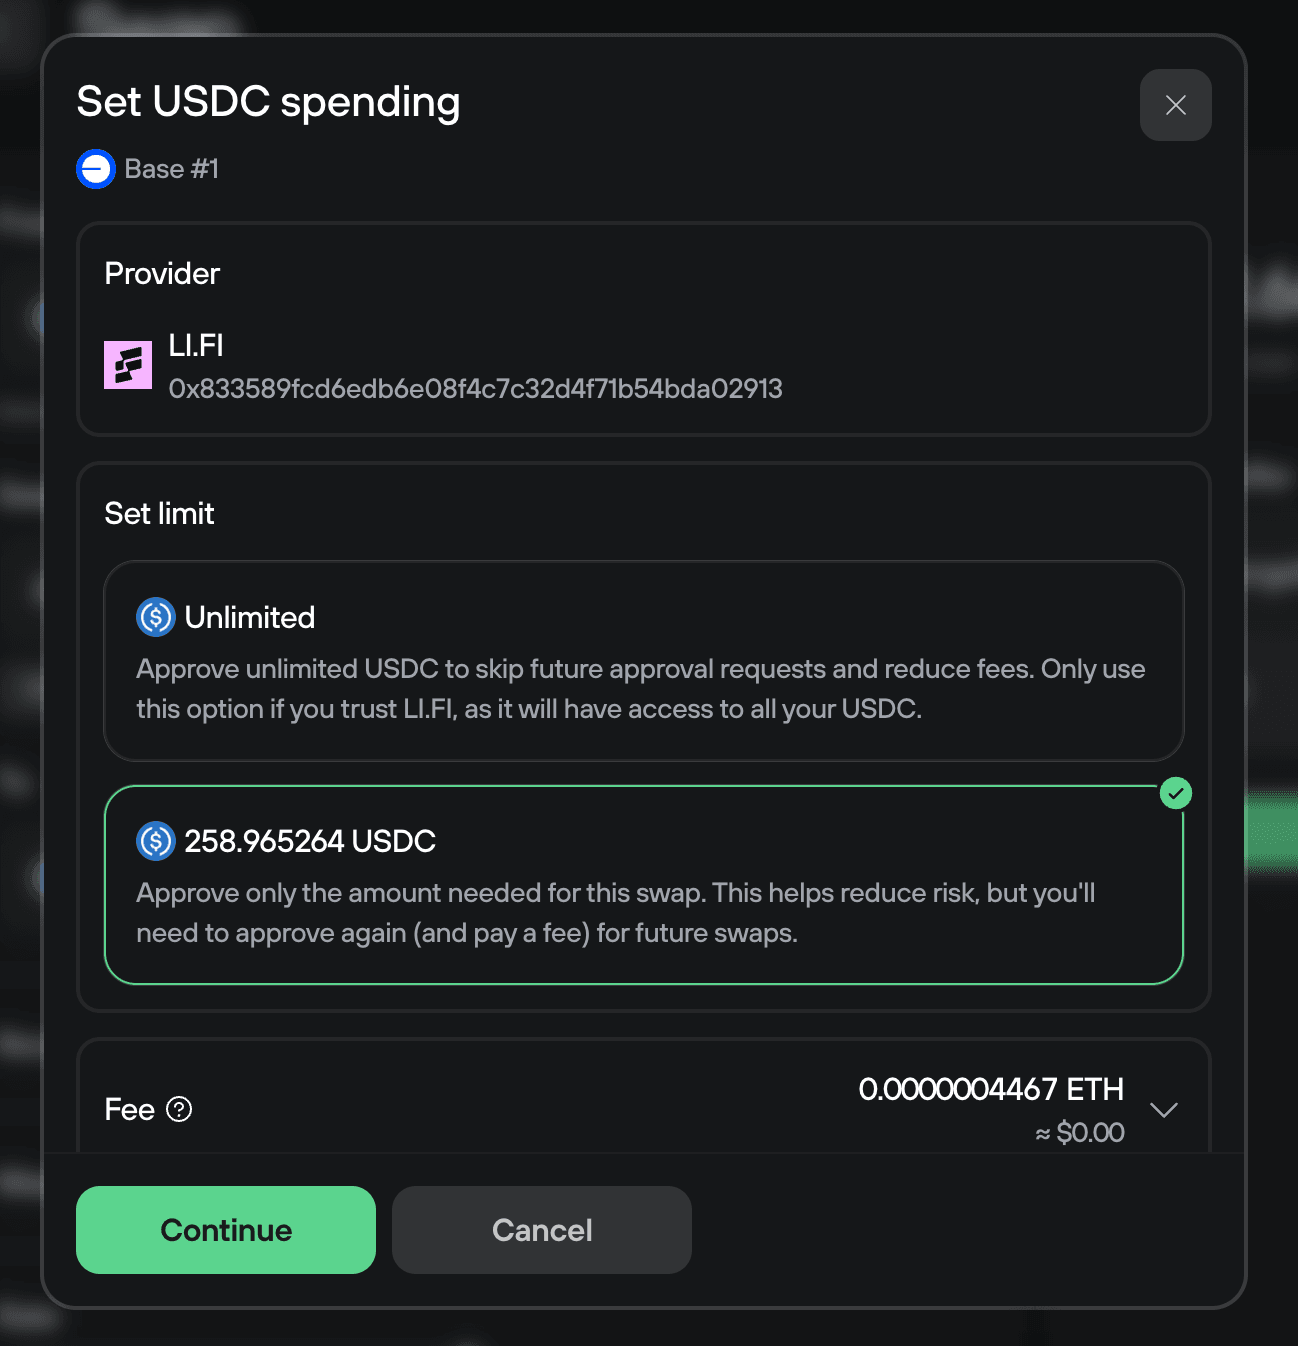
- Unlimited: Allows the provider to access all your tokens of this type without future approvals. This is more convenient if you’re planning on completing many swaps but riskier since the smart contract has ongoing access to your tokens.
- Specific amount: Only approves the exact amount needed for this swap. This is safer but requires a new approval (and gas fee) for each future swap with this provider.
Review the approval details and fee, then click Continue.

Review the approval details on your Trezor device, then hold to sign on your Trezor device.
Then, click Approve USDC (or whatever token you're approving) to broadcast the transaction.
The approval will appear as pending in Trezor Suite. This usually takes just a few seconds to confirm.
Completing the swap
Once the approval confirms (or if you're swapping on the same network and didn't need approval), you'll be ready to complete the swap.
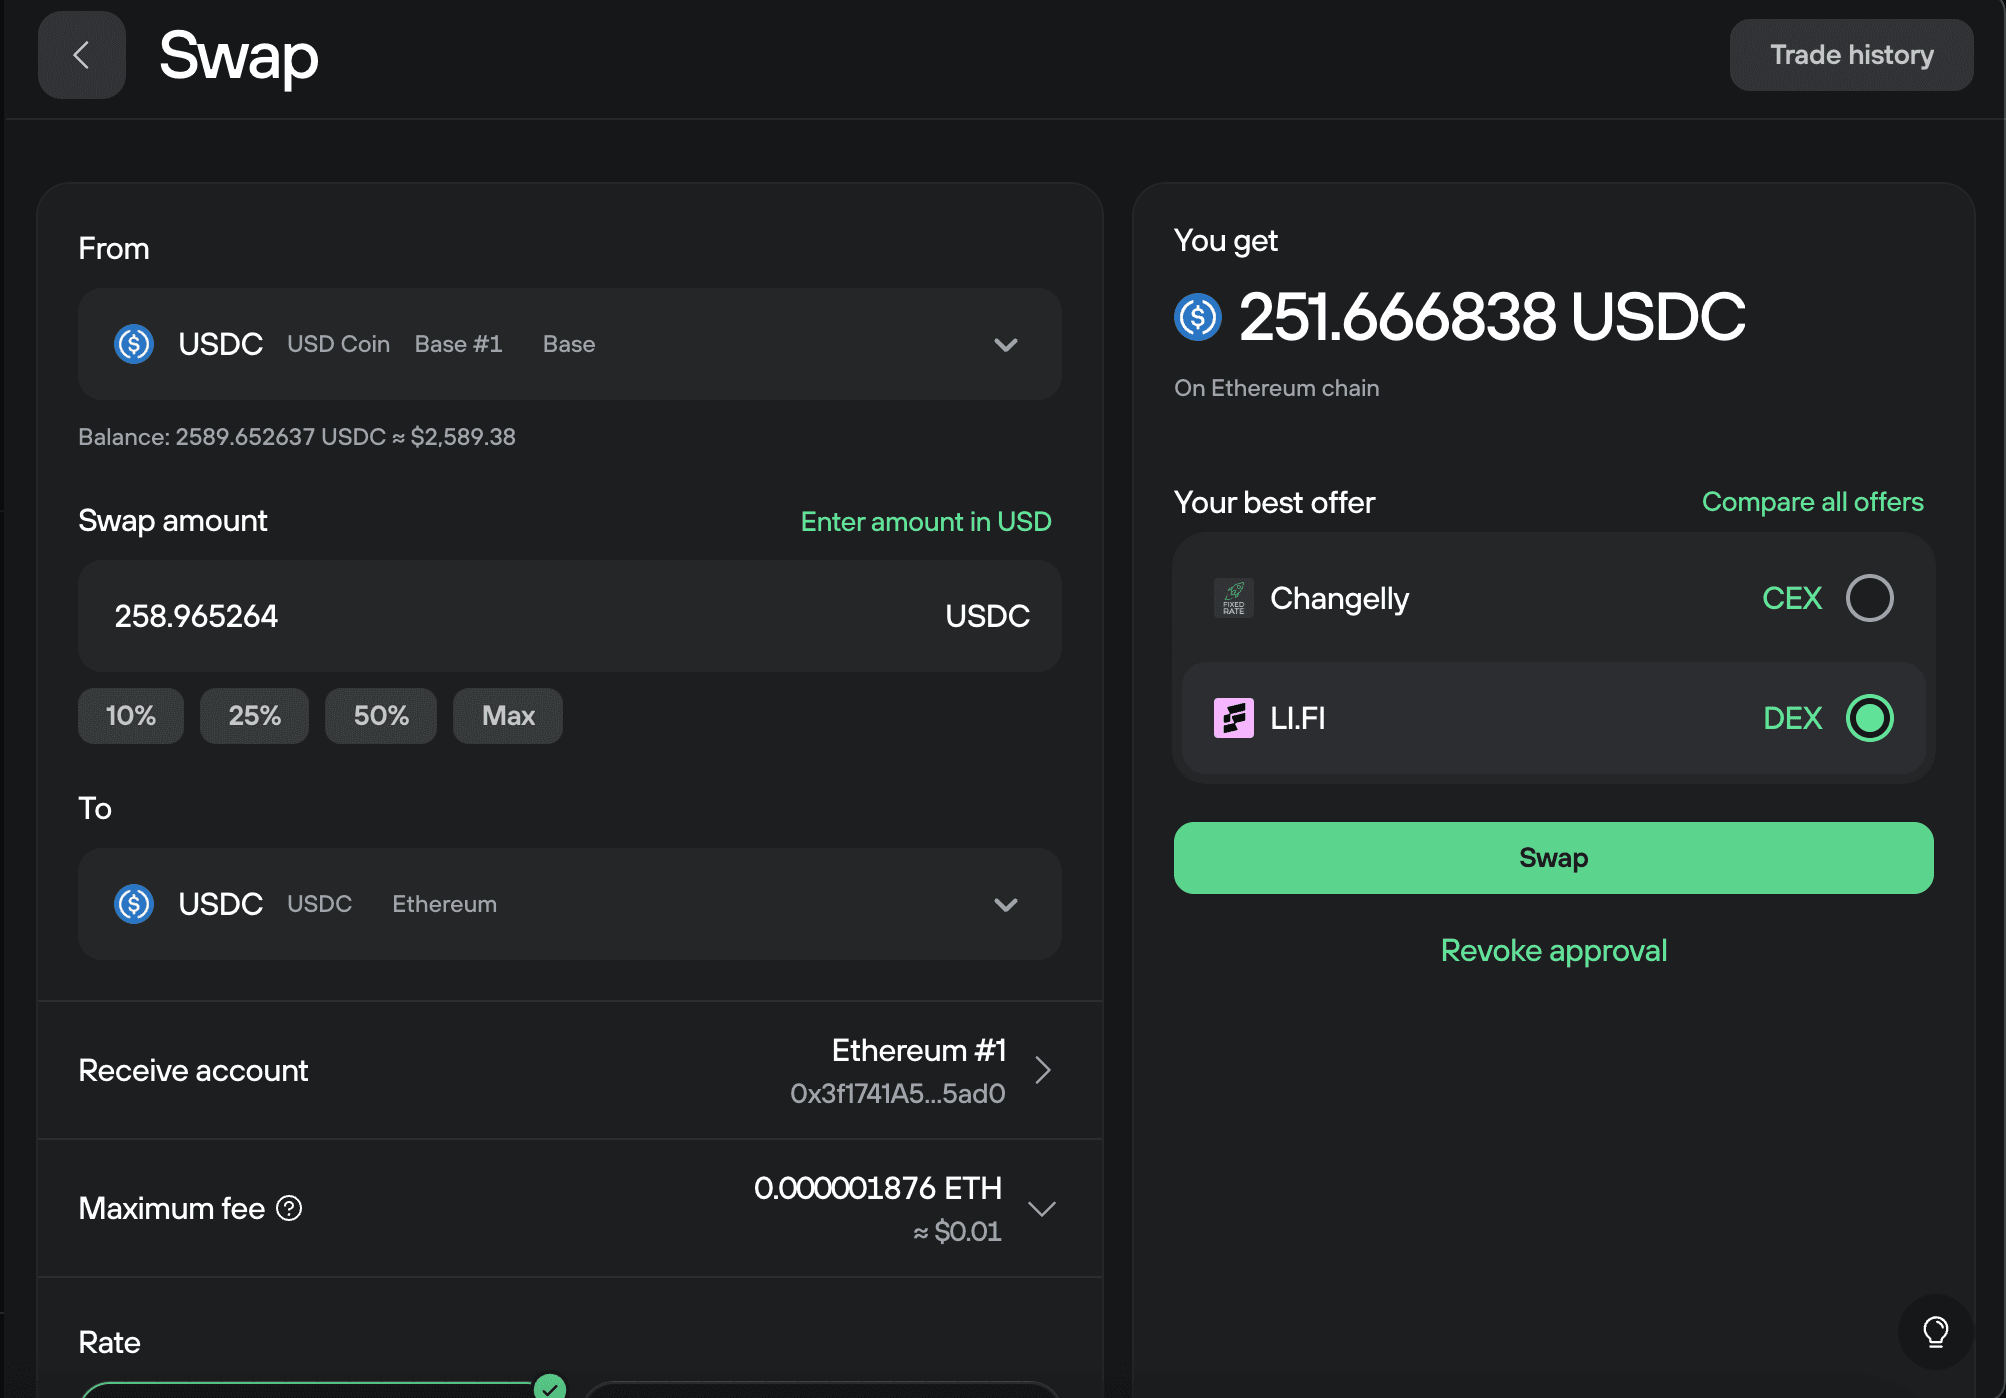
Click Swap to continue with your exchange.

Review the security information and legal notices, then click I'm ready to swap.
Review the swap summary. The default 1% slippage is appropriate for most swaps.
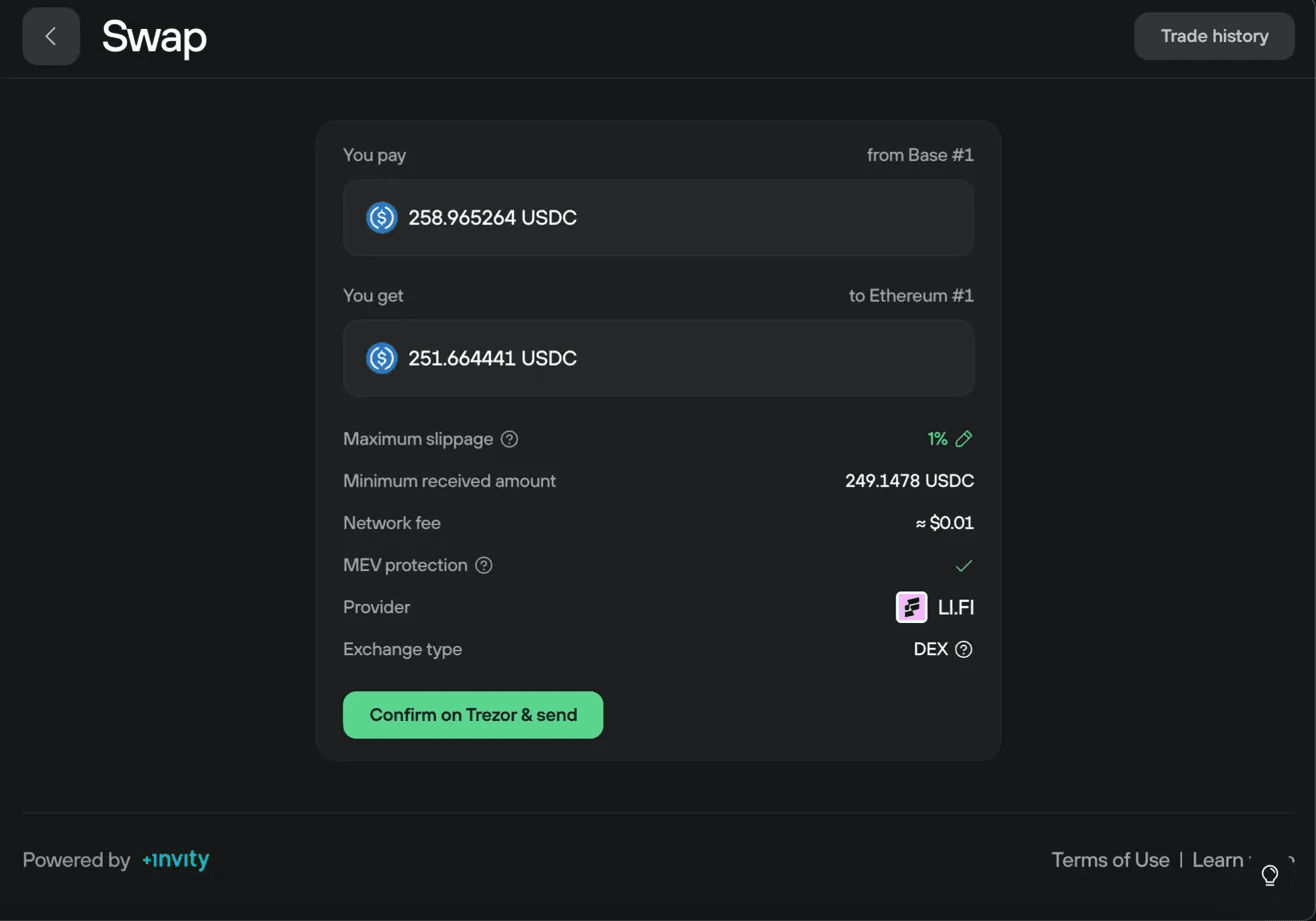
Don't adjust slippage unless you have a specific reason. Changing it can significantly affect your final price.
Click Confirm on Trezor & send.
Review the details and sign the transaction on your Trezor device, then click Swap to broadcast the transaction and complete your exchange.
Revoking token approvals
After completing a cross-network swap where you approved token spending, you can revoke the token approval you granted to the DEX provider. This removes the smart contract's permission to access your tokens.
Revoking approvals is good security practice, especially if you set unlimited approvals or won't be using that provider again soon.
From the Swap screen after your approval confirms, you'll see a Revoke approval button alongside the Swap button.
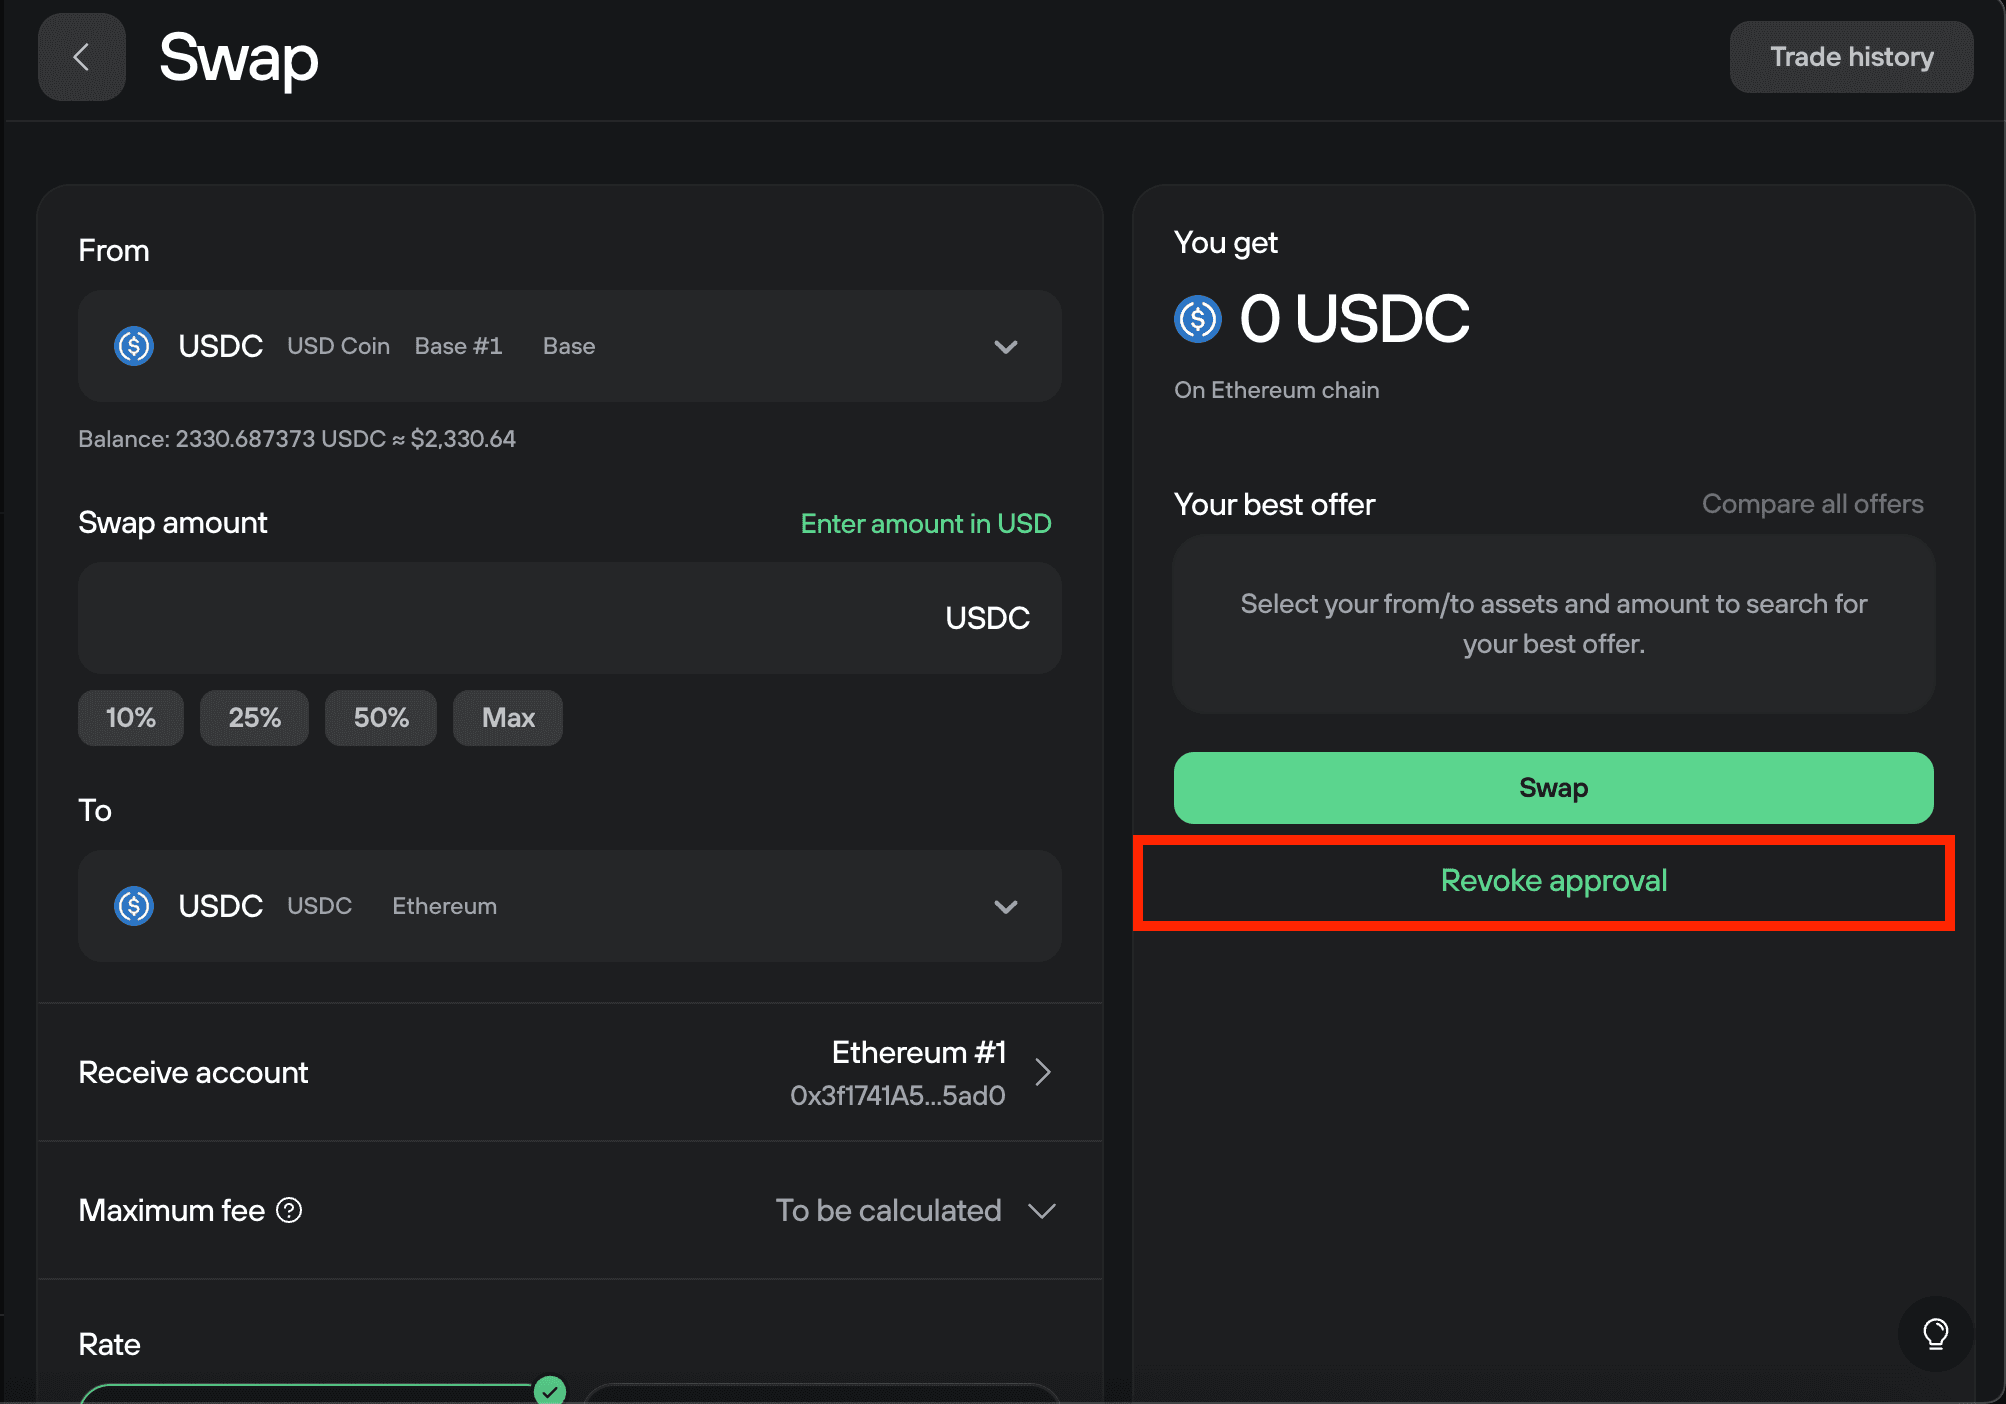
Click Revoke approval if you want to remove the provider's access to your tokens.
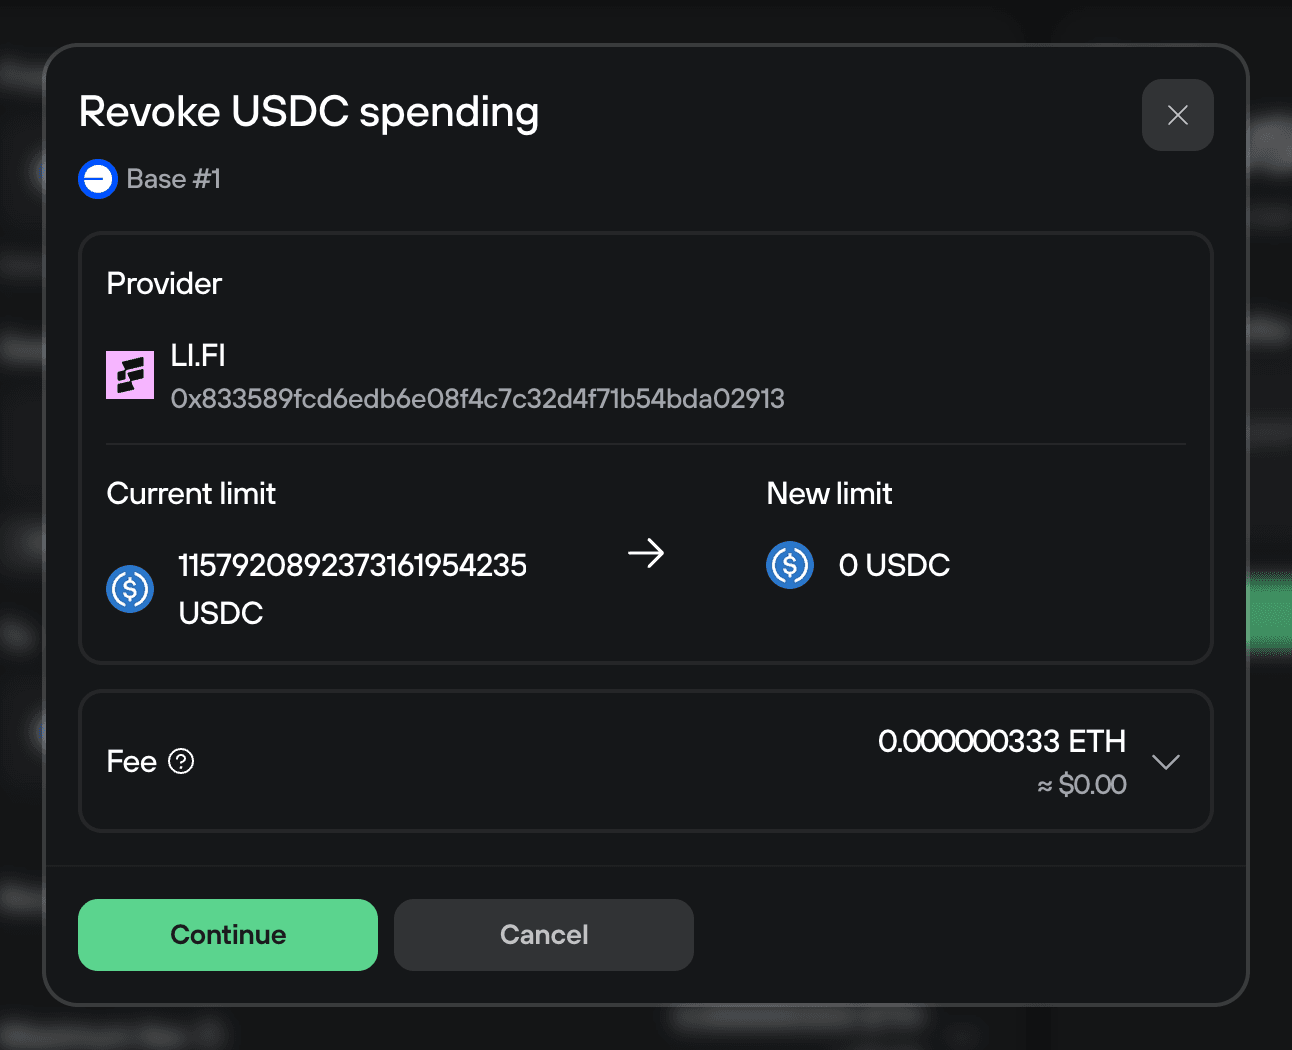
Trezor Suite will show the revocation transaction details. Click Continue.
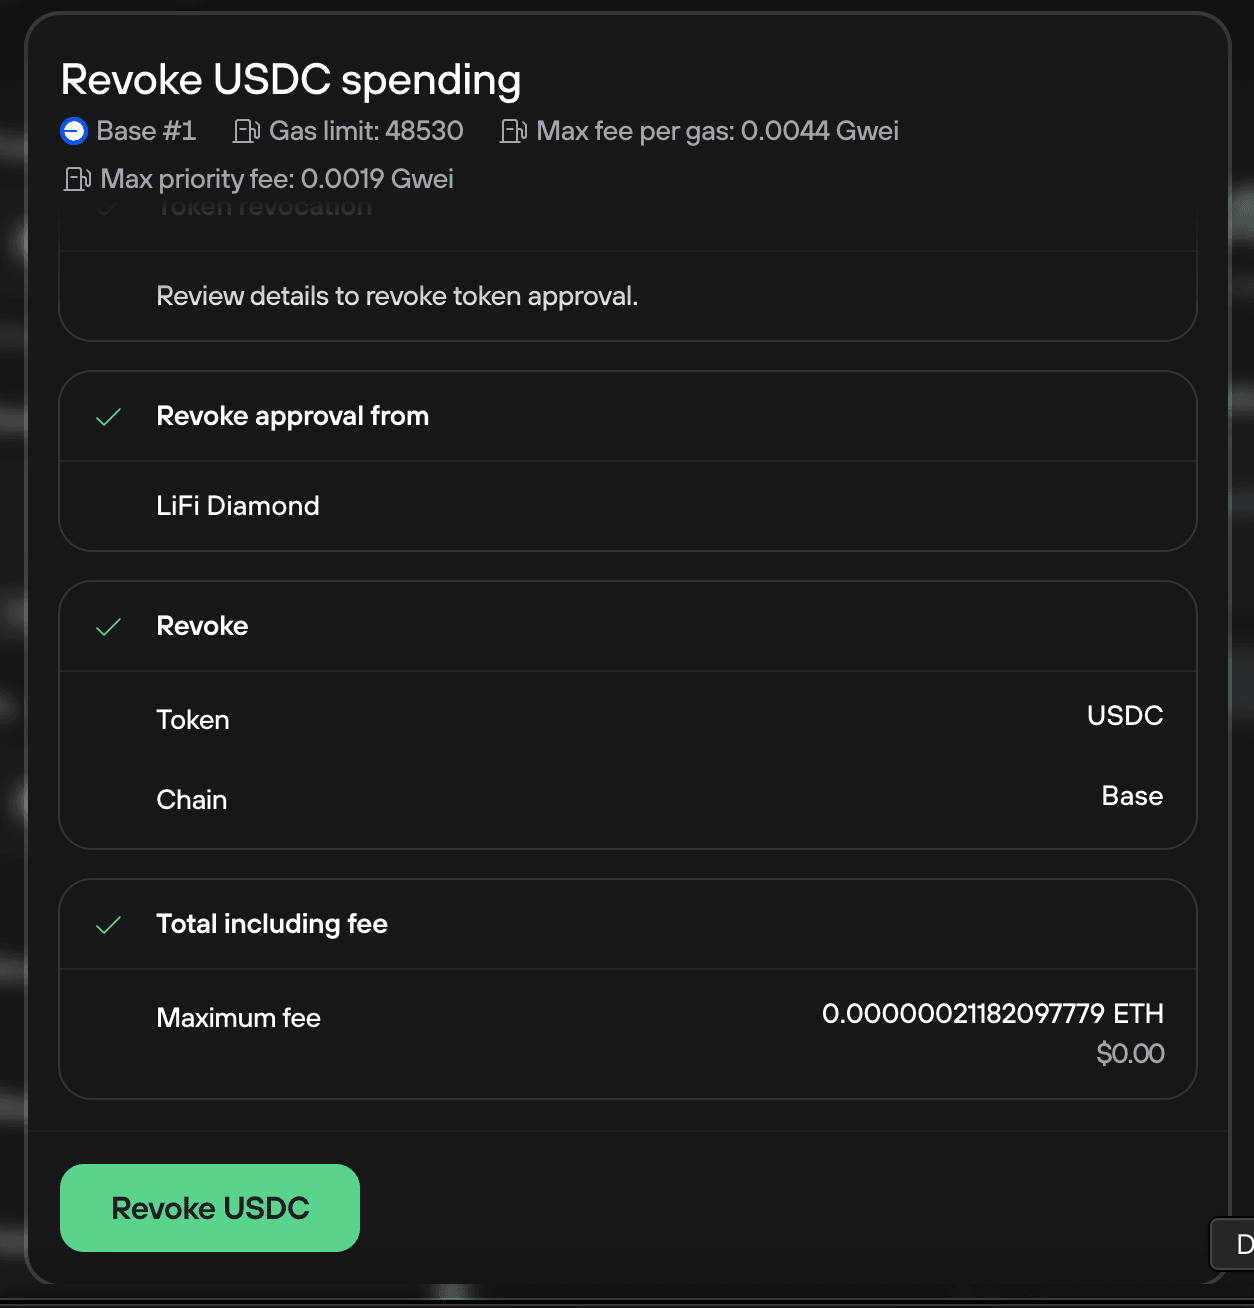
Review the details and confirm the transaction on your Trezor device, then click Revoke USDC (or whatever token you're revoking) to broadcast the transaction.
Want to check all your token approvals? Use revoke.cash and connect your Trezor using WalletConnect to view and revoke all approvals across your wallet. Learn more about WalletConnect in Trezor Suite.
Swapping to unsupported chains
Trezor Suite's swap feature supports exchanges to networks that aren't directly supported in Trezor Suite itself. For example, you might want to swap tokens to Avalanche even though Avalanche accounts aren't available in Trezor Suite.
This works with both centralized exchanges (CEX) and decentralized exchanges (DEX).
How it works:
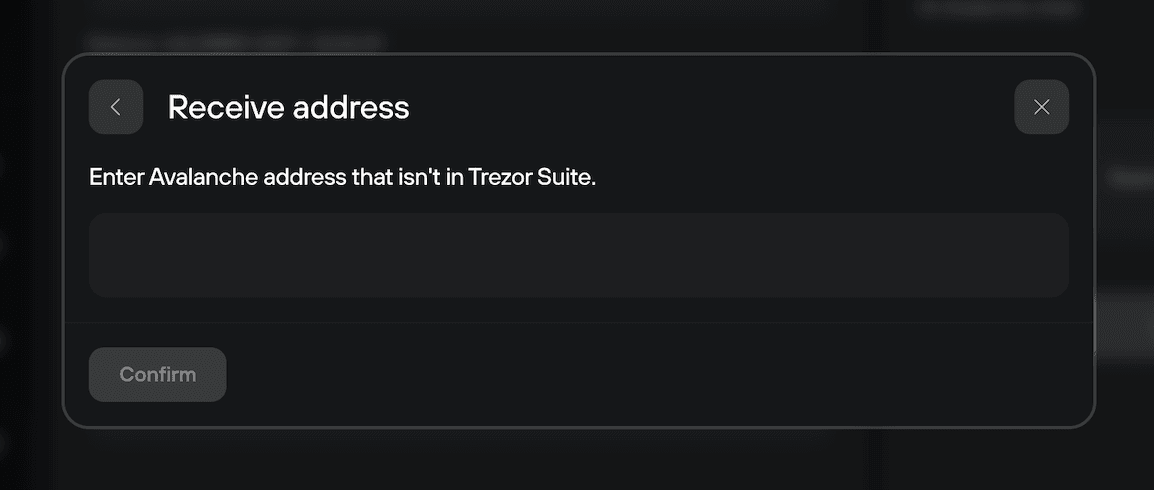
After selecting your swap details, Trezor Suite will display Account not found if the receive network isn't supported.

Click Use an account that isn't in Trezor Suite.
Enter the receive address manually. This could be an address from:
- A third-party wallet you've connected your Trezor to (like MetaMask)
- A completely separate wallet you own
You are responsible for verifying the receive address is correct and that you control it. Trezor Suite cannot recover funds sent to an address you don't own. Double-check the address before confirming.
The rest of the swap process works the same way: review details, confirm on your Trezor device, and complete the transaction.
Frequently asked questions
Which Trezor devices can I use to swap crypto?
You can use any Trezor device to swap crypto, as long as the cryptocurrencies you want to swap are supported. Check supported coins at trezor.io/coins.
Can I swap between any cryptocurrencies?
With centralized exchanges (CEX), you can swap between any supported assets across different blockchains. With decentralized exchanges (DEX), you can only swap tokens on the same EVM-based network.
Do I need to provide ID to swap?
It depends on which option you choose. Centralized exchanges may require KYC (identity verification). Decentralized exchanges do not require any personal information or account creation.
What if my swap fails or gets stuck?
If your swap doesn't complete or stays pending, contact Trezor Support through our Chatbot Hal. Have your Trade ID ready - you can find it by clicking Trade history in the top right corner of the Swap screen.