Bitte beachten: Unsere Artikel sind derzeit nur auf Englisch verfügbar.
New menu navigation on the Trezor Safe 3
The November 2026 firmware release (version 2.13.1) introduces a new menu layout and navigation controls on the Trezor Safe 3, aligning it with the Safe 5 and Safe 7. It also makes it easier to check important details before you approve an action, such as the account, derivation path and fees, which are now available from the menu.
The update also applies to the bootloader, so the screens shown during processes such as firmware updates and factory reset change too.
This article explains the new controls and how they affect everyday use of the Safe 3. Your wallets, accounts, wallet backup etc aren’t affected.
New controls at a glance
| Action | What it does |
|---|---|
| Press the left Menu button (≡) | Opens the context menu (extra information, QR code, Cancel). |
| Press the left Cancel button (✕) | Cancels. You see (✕) only on screens without a menu. |
| Press the right button | Continues or confirms. |
| Press both buttons | Selects the highlighted menu item. Also confirms warnings. |
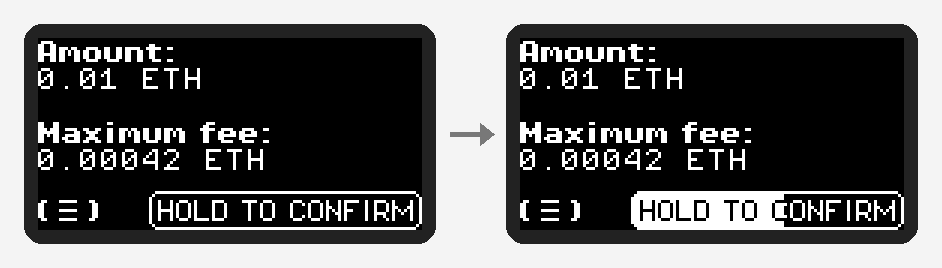
| Hold the right button | Confirms a summary, for example before you sign a transaction. |
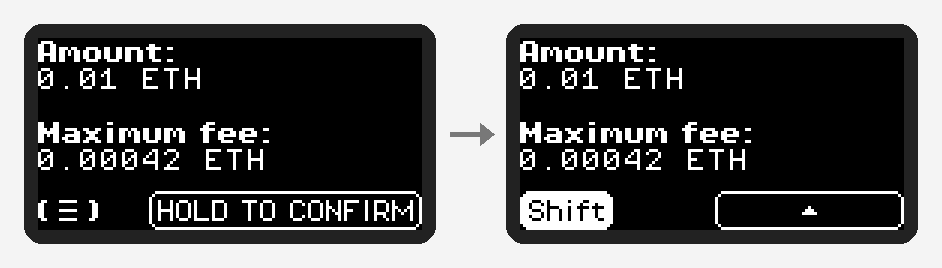
| Shift: hold the left button, then press the right button | Scrolls up, or goes back from the first page. Available when the left button is shown in brackets, (≡) or (✕). While held, the left button reads "Shift". |
How the new controls work
Menu button
Press the left button (≡) to open the menu. The menu displays one item at a time. A page counter in the top-right corner shows where you are, e.g., 1/3.
- press the right button to go to the next item
- press the left button < to return to the previous item
- press both buttons simultaneously to open the item you’re on
- on the first item, the left button shows a (✕); press it to close the menu and return to the previous screen
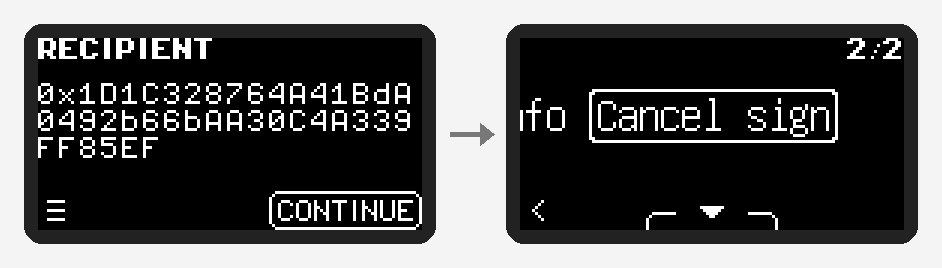
Cancel is always the final item in the menu. When you sign a transaction or message, it says “Cancel sign”.

Hold to confirm
Certain steps require extra care and attention, e.g., confirming final transaction details prior to signing it. On these screens, you need to hold the right button for about 1 second. When you do this, the progress bar fills from left to right.
Shift: go back or scroll up
The Trezor Safe 3 no longer has separate 'Back' or arrow buttons; you can now use Shift instead:
- hold the left button momentarily and you’ll see it change to "Shift"
- keep holding it and press the right button
This allows you to scroll up; on the first page of a flow, you’ll go back to the previous screen.
Shift is available when the left button is shown in brackets: (≡) or (✕). While you hold the left button, it shows "Shift".
What changes for everyday tasks
Confirm a receive address
| Action | Before | Now (as of firmware 2.13.1) |
|---|---|---|
| Confirm | Press both buttons (CONFIRM) | Press the right button (Confirm) |
| QR code, account info | Info button ⓘ on the right | Menu (≡) → QR code, Account info |
| Address does not match | Left button (went directly to “Address mismatch?”) | Menu ≡ → Cancel (last menu item; goes to “Address mismatch?”) |

Send a transaction
The signing flow now matches the other Trezor Safe models: info and Cancel are now found in the menu, and the final step is a deliberate long hold (approx. 1 second) instead of a two-button press.
| Action | Before | Now (as of firmware 2.13.1) |
|---|---|---|
| Recipient screen | ✕ or CONTINUE | Menu ≡ → Account info / Cancel sign |
| Fee details | Info button ⓘ | Menu ≡ → Fee info |
| Final summary | Press both buttons (CONFIRM) | Hold the right button to confirm |
| Go back | Left 'up' button ^ | Shift (hold left + tap right) |
| Cancel | Left button on the recipient screen | Cancel sign (last item in every menu) |

Sign & Verify
On the address signing screen, the menu now has More info. It shows the account, the derivation path and the message size. The Safe 3 did not show this information before.

To sign, hold the right button on the message screen, as before.
Long format data
Long messages and contract data now appear on one screen with several pages. Use the right button and Shift to move between pages. If you do not want to review every page, the menu has Confirm without review.
Firmware update and factory reset
These screens belong to the bootloader. They now use the same navigation.
| Screen | What you see now (as of firmware 2.13.1) |
|---|---|
| Start screen | Menu ≡ on the left, CONNECT on the right |
| Start screen menu | Reboot, Factory reset |
| Waiting for connection | ✕ to cancel |
| Firmware installation | Menu ≡ with Fingerprint and Cancel; INSTALL on the right |
| Factory reset | Confirm with both buttons |
To check the firmware fingerprint during an update, open the menu and select Fingerprint.
Other improvements
- More information on screen. The Safe 3 now shows account info, the source account, and network or warning labels on addresses. Most of this is in the menu.
- Page counter. A number such as 1/3 shows your position on long screens and in menus. It replaces the old dots scrollbar.
- Recovery words. The wallet backup screens no longer show a scrollbar.
- New tutorial. The device tutorial now teaches the menu, holding to confirm, pressing both buttons and Shift. At the end, a menu lets you select Complete or Restart tutorial.
Frequently asked questions
Do I need to do anything? No. The new navigation is active after you install firmware 2.13.1 in Trezor Suite. Your wallet, accounts and recovery words do not change.
Which devices get this change? All Trezor Safe 3 devices. Trezor Safe 5 and Trezor Safe 7 already use menu-based navigation.
How do I cancel a transaction now? Press the left button ≡ to open the menu. Go to the last item, Cancel sign, and press both buttons.
How do I go back to the previous screen? Use Shift. Hold the left button until it shows "Shift", then press the right button.
Why do I have to hold the button to confirm? Holding the button prevents accidental confirmation of important steps, such as sending funds.
Can I see the tutorial again? The device tutorial runs once, when you set up your Trezor. Trezor Suite does not yet have an option to repeat it.