All articles
Coinjoin in Trezor Suite
Follow this guide to learn how to set up your coinjoin accounts and start anonymizing your funds.
TABLE OF CONTENTS
- Adding a coinjoin account in Trezor Suite
- Add funds to your coinjoin account
- Coinjoin fees
- Coinjoin fees in practice
- Start coinjoin
- Automated signing on Trezor
Adding a coinjoin account in Trezor Suite
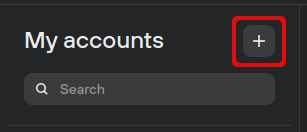
- At the top of the 'My accounts' menu bar, click the plus sign:
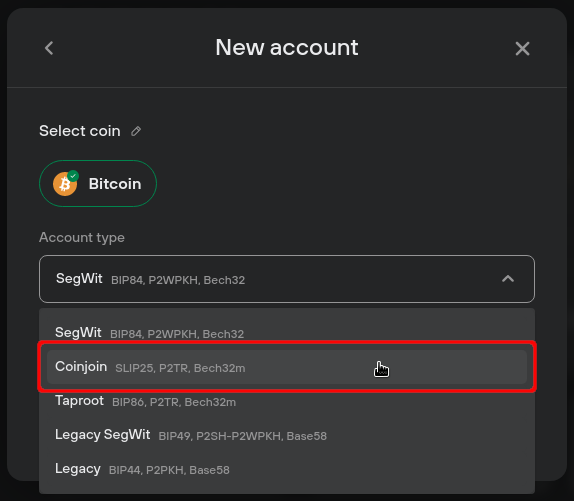
- In the 'Account type' drop-down menu, select 'Coinjoin':
- Then select Add account.
- If you do not have Tor enabled, follow the prompt to Enable Tor:
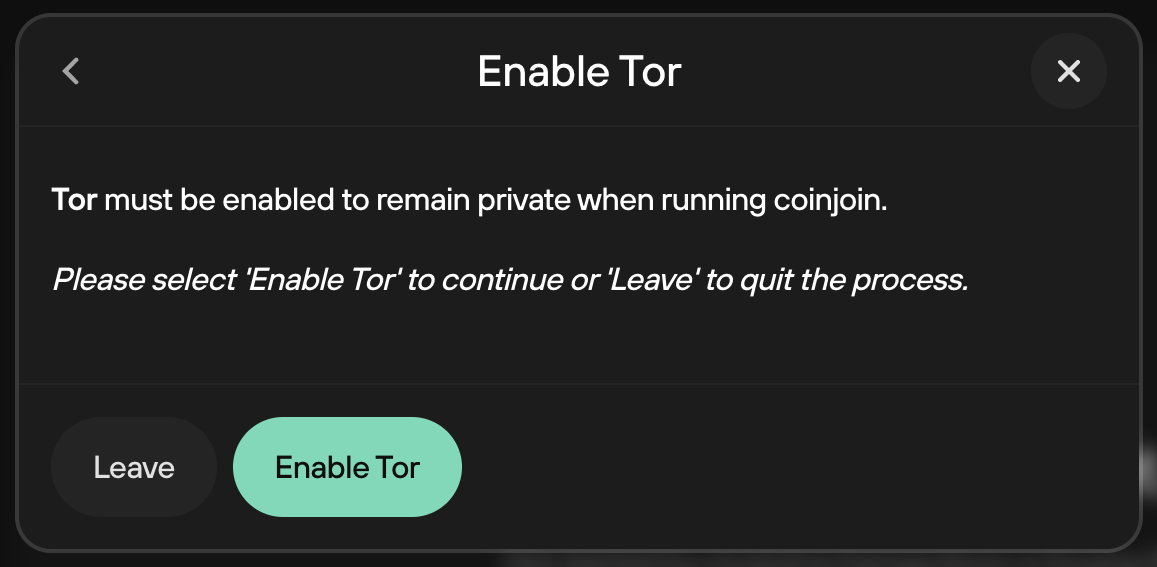
Tor must be enabled for coinjoin to work. You can learn more about Tor on the Trezor knowledge base.
- Your Trezor will then ask you to allow access to your coinjoin account. Press the green check mark button on your device to confirm.
Trezor Suite will then run a coinjoin account discovery, which may take significantly longer than regular account discovery. This is expected behaviour because:
- We download whole blocks so that nobody can tell which transaction we're interested in.
- We don't download all of them, but only the ones that could theoretically contain one of our transactions (we use blockfilters to do this).
- We use Tor, which is slower, but it doesn't give away your IP address.
- We use different Tor identities - individual queries are not linked.
- We made the process very similar to Wasabi, so that we are interchangeable with them.
After completion, your coinjoin account is ready to receive funds. It is recommended to use a minimum of 10,000 sats (0.0001 BTC) for coinjoin. Ideally, the total value of your coinjoin input should be 1,000,000 sats (0.01 BTC) or more, otherwise coinjoin may be uneconomical.
Add funds to your coinjoin account
Once you've added your coinjoin account to Trezor Suite, the next step is to send yourself some bitcoin (from your regular account) so that it can be anonymized.- On the coinjoin account overview page click the Receive BTC button.
- On the 'Receive' page you'll see the beginning of a fresh address that you can use to receive your bitcoin.
- Click on Show full address and then confirm the address using your Trezor.
- Once confirmed, click on 'Copy address' and then close the receiving address modal window.
- Navigate to your regular bitcoin account (the account holding the coins you wish to anonymize) and select Send.
- Paste the receiving address into the 'Address' field.
- Enter the desired amount of bitcoin you wish to send to your coinjoin account into the 'Amount' field; alternatively you can use the 'Send max' toggle switch to send all funds from your regular bitcoin account to your coinjoin account.
The recommended minimum amount for coinjoin is 1,000,000 sats (0.01 BTC).
- Set a Fee.
- Once you've finalized the transaction details, click on Review & Send and confirm the transaction details using your Trezor device.
- Finally, click on Send in Trezor Suite.
Once the transaction is confirmed and the funds have landed in your coinjoin account, you are ready to reclaim your privacy.
Coinjoin fees
A 0.3% coordinator fee will be taken from fresh coins greater than 1,000,000 sats (0.01 BTC). There is no such fee for UTXOs below this amount.As with any other bitcoin transaction, you also need to pay mining fees. For coinjoin, you must pay a mining fee for each round.
These mining fees are what you normally pay when sending bitcoin from one address to another, as an incentive for miners to add transactions to the blockchain. You can learn more in our transaction fees article.
Re-running coinjoin is free, as well as coinjoining coins 1 hop from a previous coinjoin (although mining fees still apply). This means that when you receive coins from another coinjoin (1 hop) you will only pay the mining fee for the transaction, but not the coordinator fee. However, if a coin has more than 1 hop, the coordinator fee must be paid again.
Outputs of less than 5,000 sats (0.00005 BTC) will be dropped, as such small amounts could harm your privacy.
Coinjoin fees in practice
The funds you add to your coinjoin account will be charged a service fee at most once. Re-running coinjoin for the same funds is always free of service fees.If a UTXO is successfully used up in a coinjoin transaction, but the output (i.e., new UTXO) does not reach the desired anonymity level, running coinjoin again will not require a service fee payment, i.e., you are not charged the same service fee twice.
Therefore, for any UTXO that is unsuccessful in registering for a coinjoin transaction, the service fee must still be paid when it gets coinjoined.
For example, if 90% of your UTXOs were successfully coinjoined and paid a service fee, but the remaining 10% were not successful, the service fee still needs to be paid for the remaining 10% if they are coinjoined in a future round.
However, if that 10% of UTXOs did get coinjoined but the outputs didn’t achieve the desired anonymity threshold, then these UTXOs can be used as inputs for another coinjoin without paying the service fees again.
The following example should help illustrate the principles described above:
- First, a user sends 2,000,000 sats to their coinjoin account.
- Coinjoin requires 6000 sats service fee (i.e., 0.3% of 2,000,000 sats) plus network mining fee.
- Re-running coinjoin only requires payment of the network mining fee.
- The user sends another 1,000,000 sats to their coinjoin account.
- User coinjoins again and must pay 3000 sats service fee (i.e., 0.3% of 1,000,000 sats) plus network mining fee
Start coinjoin
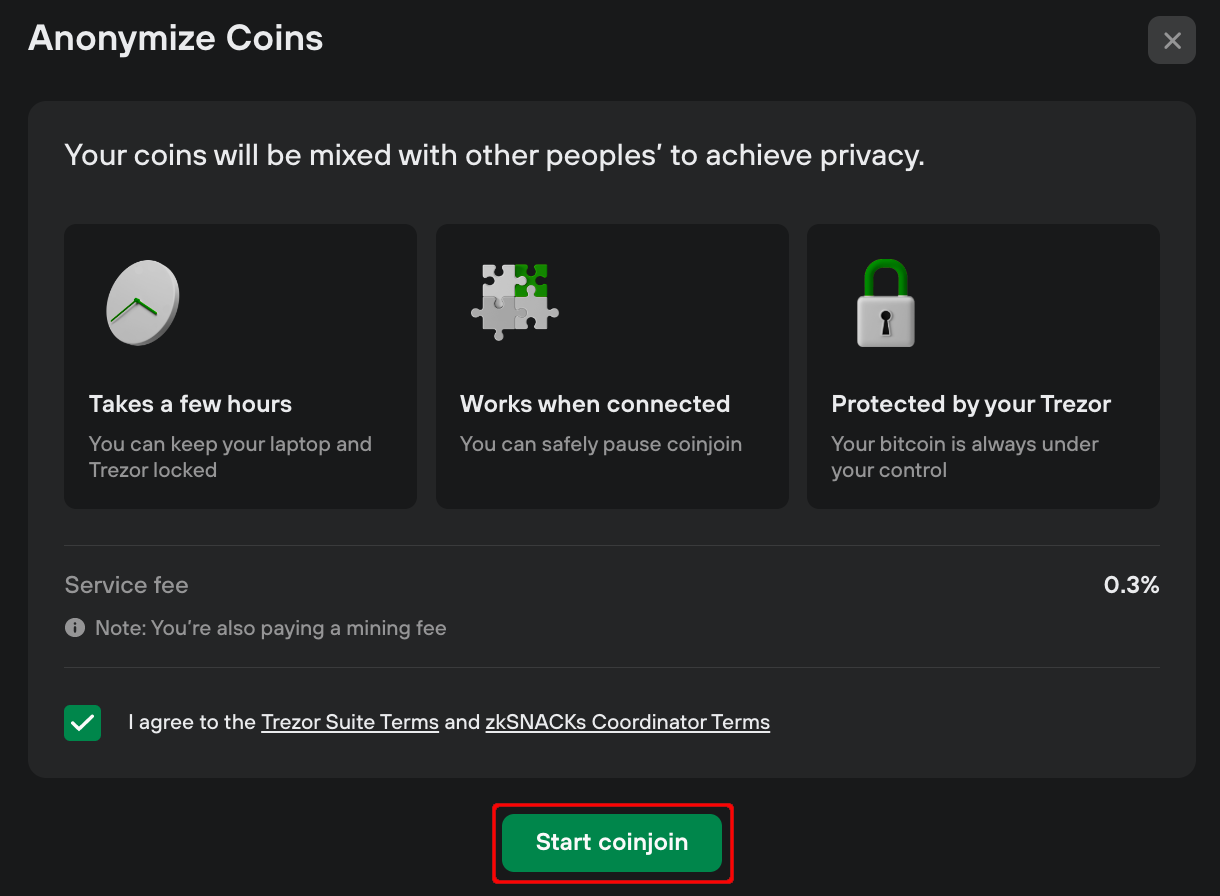
Once you've added bitcoin to your coinjoin account, you can begin the process of making these funds private:- Start the coinjoin process by selecting Start:

- Read the Trezor Suite and zkSNACKs Coordinator terms and check the confirmation box; then click the Start coinjoin button:
- Confirm on your Trezor device that you want to take part in a series of coinjoin rounds, and Trezor Suite will start looking for a coinjoin round.
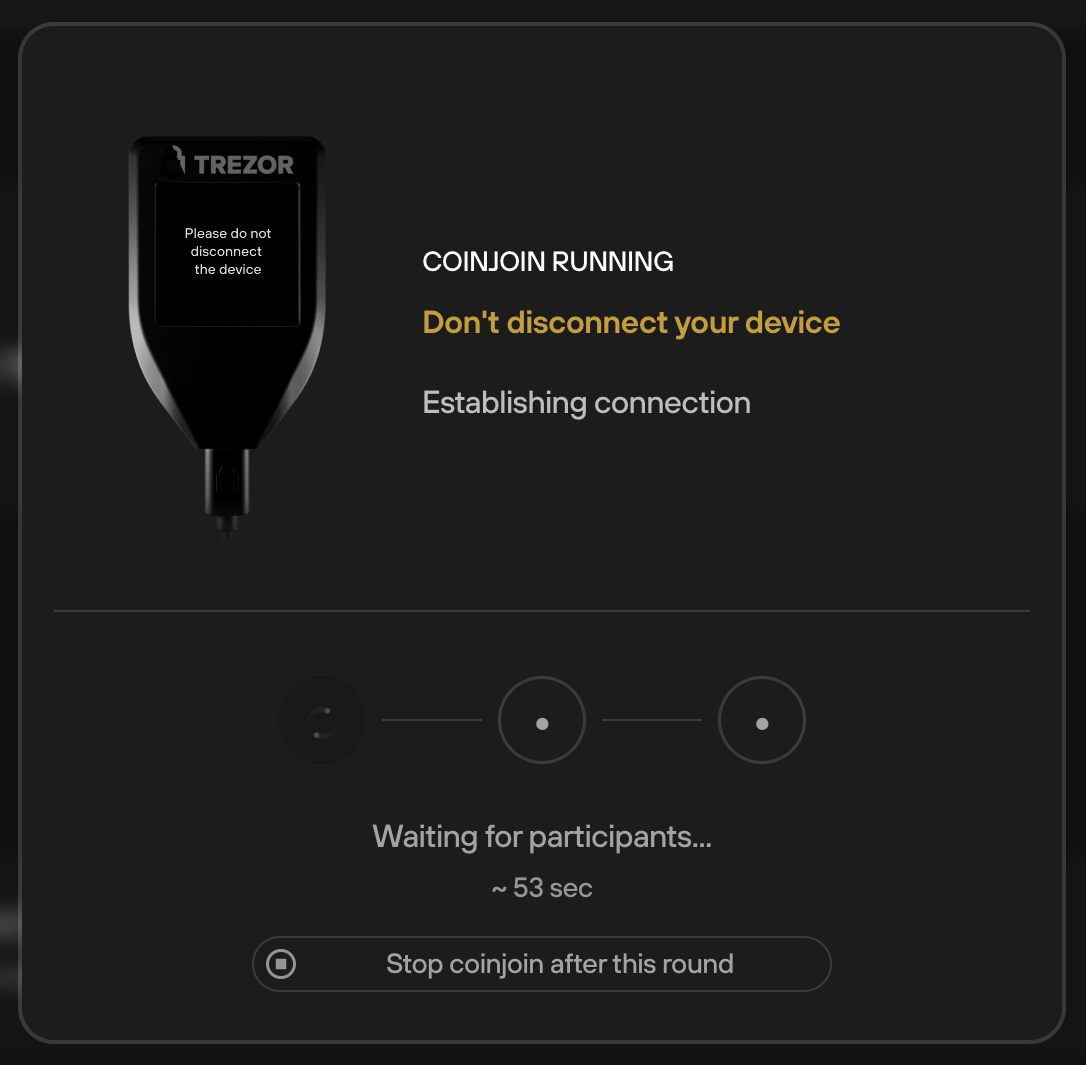
While coinjoin is running, keep your Trezor connected and Trezor Suite running in the background. Do not disconnect your device when you see the following prompt (otherwise you may be prevented from joining future coinjoin rounds):
- At the end of the coinjoin process, if you have achieved the desired anonymity for all coins, you will see the following confirmation dialogue:
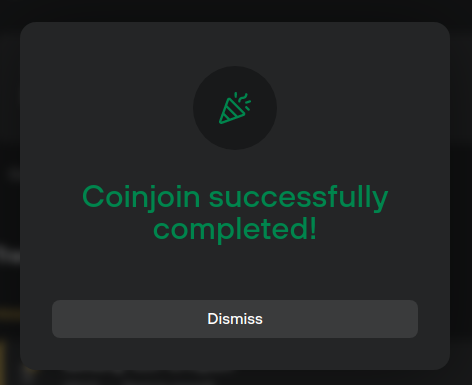
If you have not anonymized 100% of the funds in your coinjoin account, you can simply re-run the coinjoin process. This will not compromise the privacy of your funds that already meet the desired privacy threshold.
Automated signing on Trezor
Coinjoin consists of a series of transactions involving many participants. Your Trezor needs to be plugged in the entire time, so that it can automatically sign each coinjoin transaction when the time comes.When you click the Start coinjoin button in Suite, your Trezor will ask you to authorize two things on its screen:
- The maximum number of rounds (coinjoin transactions) that you are willing to take part in.
- The maximum mining fee you're willing to pay for your inputs and outputs in each coinjoin transaction.
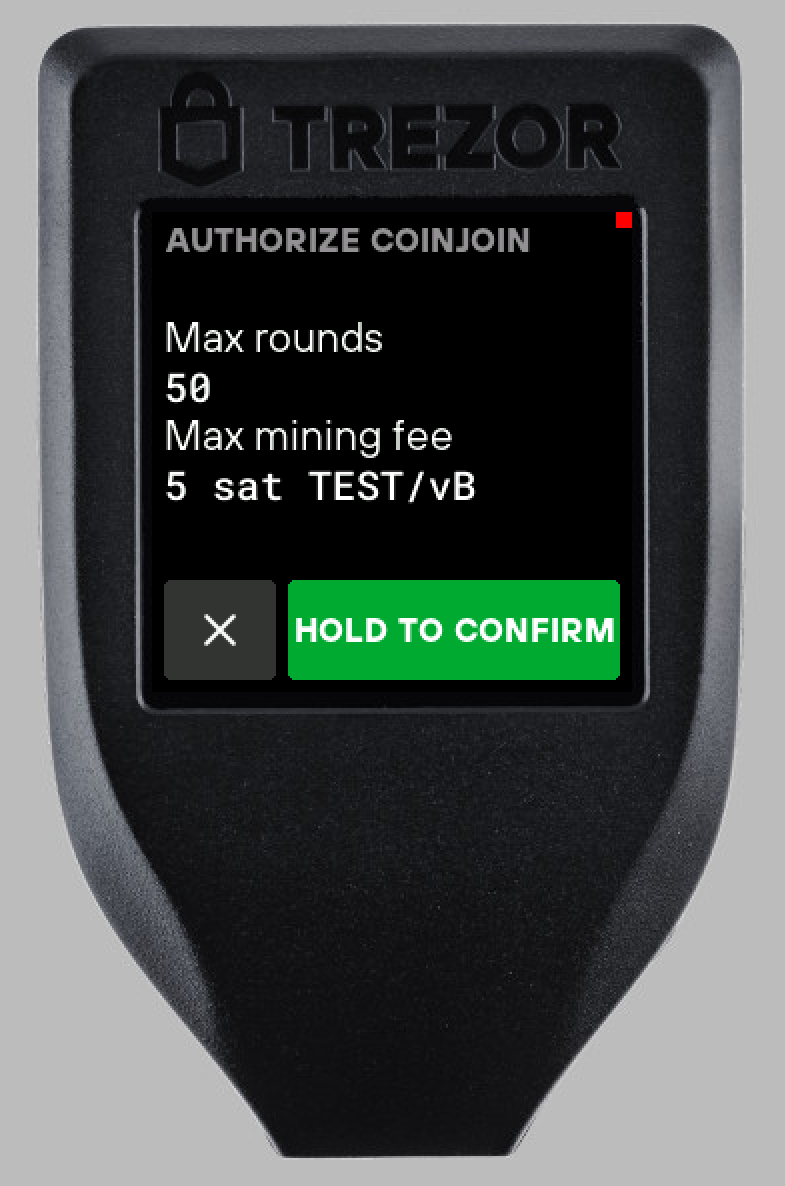
Once you have confirmed these parameters, Trezor will automatically sign coinjoin transactions on your behalf as long as they are in accordance with what you authorized and with zkSNACKs terms and conditions.
Answers to the most common questions related to coinjoin on Trezor hardware wallets can be found on our dedicated Coinjoin FAQs page.